 STC EMBER SHRINE

Add another post to the other side, removing the pokey bit in the same
manner.
Now in order to get this piece to sit level on top of your shrine, you'll
need to add a strip of plastic to the back of it. You can use an
extra floor panel for this job. Using the squares as a guide, cut
off one row of squares to form a strip of plastic...
as seen here.
Now glue this strip of plastic onto the back of the railing assembly,
down low as shown here.
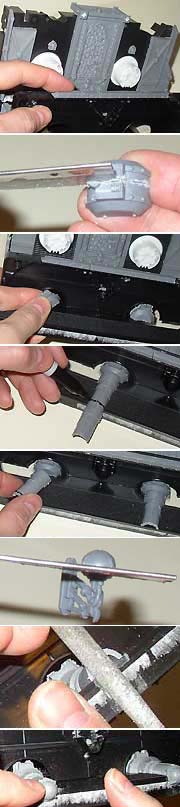
Now when you put the railing on top of the shrine, it should sit level, as shown here. The front of the top piece makes contact with the top of the skull shrine panel, and the back (with the added plastic strip) makes contact with the tape case. Glue it on, making sure to keep the posts lined up with the bulkheads so it's all nice and neat.
Now for the fun part! Grab those battery powered tea lights and the white tape reel pieces. The Tea lights get glued to the tape reels, with the flame part of the tea light going into the hole of the tape reel piece. NOTE that the flame part may be too long to fit all the way in- if so, you can cut it down with nippy cutters or a razor saw (just be careful not to cut the LED bulb inside). Once it fits all the way in, add glue to the raised edge of the reel around the hole, and press the tea light against it as shown to glue it on.
Now to glue the reels onto the back of the shrine. If you look
at the back of the shrine, you'll see that the case has some ridges around
the hole and inside the round area where the tape reels used to sit.
Add glue to these ridges, as this is where the tape reels will make contact.
Place the reels so that the protruding hub pokes through the holes towards
the front of the shrine (see below for a view from the front). Notice
that the switches and the battery doors for the tea lights are still
accessible from the back of the shrine, for easy on-off access and battery
replacement.
Once the glue is dry, the urge to try out the lights will be unbearable. Go ahead, fire 'em up! Oooh, flickery! Okay, fun's over, back to work now.
Next glue a bulkhead piece on top of the short case. Glue it on it's side with the rivets facing forward. Add the skulls you sawed off the back of the skull shrine panel too- one over each light.
Now to prepare the pipes. Start with that half-round cover piece
that comes with the Manufactorum sprue. You'll want to saw it in
half, lengthwise, as shown here. This gives you two almost identical
pieces to use below.
Glue the two pieces just inside the half-round holes (where the cut
case meets the base). You'll want them to stick out just far enough
to see the cool rivet detail on them.
Next, grab one of the half-pipe pieces and place it against the piece
you just glued, with the rivet end closest to the back. Using the
front edge of the base as a guide, mark the pipe for cutting. Repeat
for both pipe halves.
Cut down the pipes with a razor saw so the end will be flush with the
front edge of the base, and glue the pipes in place as shown.
Now to form the end cap for the pipe. Grab the dome light fixtures
and using a razor saw, cut the dome off just behind the ridge- you want
the dome and the ridge, but nothing else. File the cut clean.
The front edge of the base has a raised edge that you might want to file down, at least around the end of the pipes. This will help with gluing the domes on nice and flat.
Now glue the domes over the end of the pipes so that it hangs halfway down the front of the base, as shown. Notice how the domes give the illusion of a complete pipe, half embedded in the base. Neat!
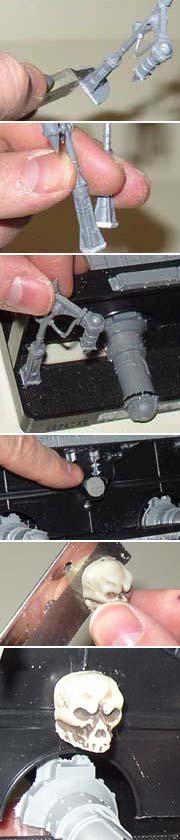
...as seen here.
Now glue the posts onto the base. I like to line up the edge of
the square shape with the inside edge of the base as shown here.
This points the lamps at an inward 45 degree angle, which adds some visual
interest.
Remember that tank wheel? It goes into the v-shaped slot on the
front of the lower case, centered nicely between the two pipes. Be
sure the cool side with the bolt holes is facing out. Just a quick
way to add some detail there.
Now for the skulls. Cut the back of the skulls off with a razor
saw. Then cut off the lower jaw, sawing between the upper and lower
teeth.
Glue the back of the skull to the lower case, one each just over the
two pipes on the base as shown here.

...so you can glue it onto the back of the shrine. Place it so
the bracket touches the reel, and the cut part touches the side of the
tea light. Glue one to each side for some free technical looking
detail.
To add even more gothic industrial detail to the back, cut off a length
of ribbed drain pipe. I like to cut about three ribs' worth.
Use a razor saw and cut close to the side of the rib.
Sand both ends of the pipe smooth for a nice finish, especially the
end you'll be gluing down.
For the end that faces out, use a hole punch to punch out notches all
the way around the end. Repeat these steps to make two of these.
Now glue the flat end of the pipes onto the two reels, as shown here.
Notice that the 3" drain pipe is almost a perfect match for the tape reels.
If you sawed off the two grill lights from the back of the skull shrine
panel, you can glue them onto the front of the lower case. There
are two raised posts (where the case screws were originally) in the upper
corners, a perfect place to glue the grill lights in.
Another optional detail is adding rivets. Use the 1/16" hole punch to punch some rivets out of an old plastic soda bottle or fast food cup. Then, pick the rivets up with the tip of a push pin or hobby knife, dip the back in a bit of glue, and press them in place. I like to add a couple to each corner, and a row along the raised ridge on the front of the lower case for that extra bit of gothic character.