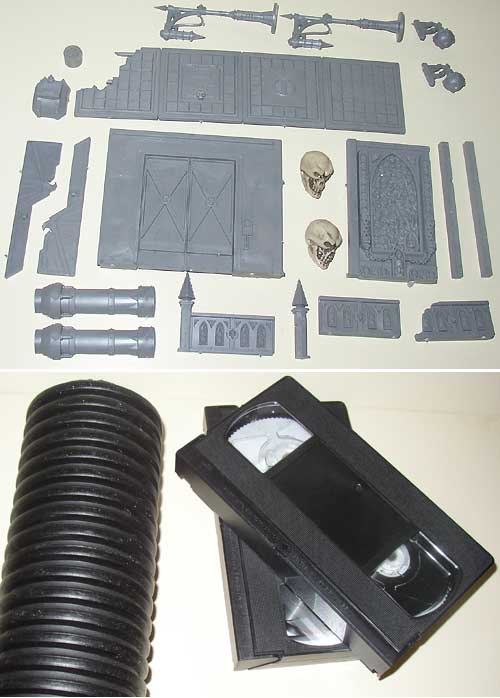
STC EMBER SHRINE
Part 1- Basic Construction

PARTS LIST (These can be found on the Cities of Death floor sprue unless noted)
+++ Two lamp posts
+++ Two small globe lights
+++ One small Tank Wheel from a Lemann Russ or Chimera kit
+++ One half-round machine cover (from the Manufactorum kit)
+++ One length of floor panel (four squares long- damaged is okay)
+++ Two Eagle buttresses (from the Sanctorum kit)
+++ One double door panel (from the Sanctorum kit)
+++ Two small plastic novelty skulls.  You can order them from US Toy- search for Skull Keychain.
+++ One Skull shrine panel (from the Basilica kit)
+++ Two bulkheads (long strips with rivets on them)
+++ Two half-pipes (from the Manufactorum kit)
+++ One railing with post
+++ One end post
+++ Two railings without posts (one damaged is fine)
+++ A length of ribbed 3" drain pipe (available at hardware / DIY shops)
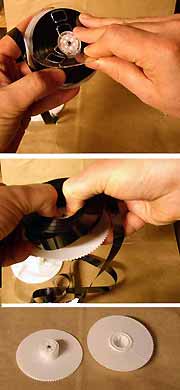
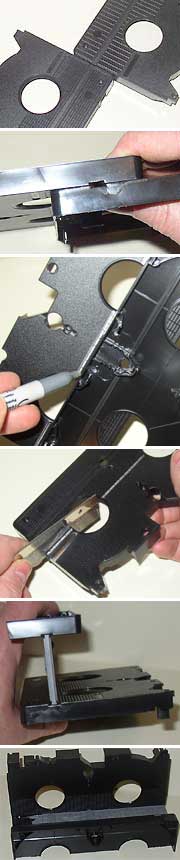
+++ Two VHS tapes
+++ Two battery operated LED Tea Lights (not shown).  You can find these at Battery Operated Candles, but check your local drug store or crafts shop first, especially around Halloween.  Be sure these are the flickering type for best effect.

TOOLS
The following tools will be a big help for this project:
+++ Model Cement
+++ Razor Saw
+++ Metal File
+++ Nippy Cutters
+++ Standard Hole Punch
+++ Sandpaper
+++ Small Phillips head screwdriver
+++ Silver Sharpie or other metallic marker
+++ 1/16" Hole Punch (optional)
+++ Pushpin or hobby knife (optional)
 
First, disassemble the two VHS tapes- use a small Phillips head screwdriver to remove all the screws, then pop the tape apart and remove the two reels and all the other little bits.

To get the tape out of the reels, snap the clear half of the reel off at the hub by gently prying upward as shown here.


Then work the tape off the reel by pressing the hub down and the tape up (once you can get your fingers under the tape, that is).


You want to save the white part of the reels.  You'll only need two of these for this project (though you can save the other two from the second tape for another project if you like).

The main body of the Ember Shrine is made from the halves of the VHS tape cases.  You'll need to cut one of the case halves down to size, but first you'll need to mark where to cut it.  Take the two halves that have holes in them, and arrange them as shown.  Note the long groove running all the way across?   You'll be using that groove.
 

Now turn the case halves so they face each other, with one groove facing the other groove as shown.  The tapes should partially overlap, as seen here.


With a silver marker, draw a line on one case, using the edge of the other case as a guide.  The line should run pretty close to the center of the two holes.  This is your cut line.


Now use a razor saw to cut along the marked line.  Cut as straight as possible.  You may notice a grid pattern molded into the plastic- if it runs near the line, you can use it as a guide for your saw to help you cut straight.


Once your cut is done, you're ready to glue the floor in.  Grab the uncut case with holes, and the cut case with holes, and test fit the floor panel in between them as shown.  The floor panel should fit nicely into the grooves on both sides. 
 

Be sure the cut case has the cut edge facing down, as shown here. Glue along the grooves and hold the whole thing together while the glue dries, making sure the two case halves stay parallel to each other and perpendicular to the floor panel (as in the pic above).   I like to have the floor panel in with the square pattern facing up, rather than the metal grate pattern, but do it however you like.

Once the floor is dry, it's time to add the end pieces.  Grab the intact railing without posts, and see how it fits into the gap under the floor at one end.  I recommend putting it under whichever end of the floor is not damaged.


You may find there's a bit of a gap when gluing it in.  If you wish, cut out a strip of sheet plastic or a short length of popsicle stick to fill the gap as shown.  Be sure that at least one side and the top of the railing piece are glued in place firmly.


Now do the same with the other end, using the damaged railing to match up with the damaged floor panel.  It won't reach all the way across, so just glue it where it makes contact on the side and top.


Now you're ready to glue your construction down to the base.  Get one of the case halves with the clear windows, and take a look inside.  You'll notice some tabs and pins that stick up past the edges- use your nippy cutters to trim these protrusions down until the case can be placed nice and level with the windows facing up.  This will be the base for the Ember Shrine.


Apply glue along the bottom edge of both halves of your assembly so far, as shown here.


Place your construction down onto the base as shown.  The short half should be facing the "front" of the base (you can see a bit of the tape label left behind on the one in the picture).


To help line everything up, take a look at the back- the tall case half with the holes in it has a back edge, that should be lined up with the base as shown here.  It should be placed almost at the edge- stop at the point where the edge has cutouts in it and has a slight downward angle. 


Now to add some more structural detail.  Grab the two eagle buttresses- these get glued on over the ends of the floor panel, up against the back case as shown here, one on each end.


Now to prepare the skull shrine panel.  Looking at the back of the panel, start by trimming off the flange at the bottom with nippy cutters. 
 

Now you can easily access the two skull icons near the bottom with a razor saw.  Carefully place the flat of the blade against the panel, and saw the two skull icons off carefully.  Take your time and make sure your thumb isn't on the the other side of your cut!
 

If your razor saw skills are up to par, you should get the icons off intact.  Set these aside for later.  You might also saw off the two round gridded lights that are back there- they can also be used as detail later.  
 

Sand the back of the panel smooth so it will be easy to glue on.  Then glue another bulkhead on the side of the panel so it has bulkheads on both sides.  The completed panel gets glued to the back case, centered between the two holes and resting on the floor panel as shown.


The next bit of detail requires you to cut out the double doors from the double door panel.  These are the doors that have an eagle icon on the front, and the x supports on the back as seen here.   Use your saw or a hobby knife to carefully cut around the doors. 


Once you have removed them, use a file to clean up the edges. It helps to sand down the raised parts of the eagles on the front of the doors too, for a better fit when gluing them on.


The two doors get glued onto the back case, outside the two holes and nestled up against the eagle buttresses as shown here.

NEXT: adding more detail...

Copyright 2009 Sean Patten

Previous Page
Back to the How-To pages
Back to Gothic scenery
Back to Necromundicon