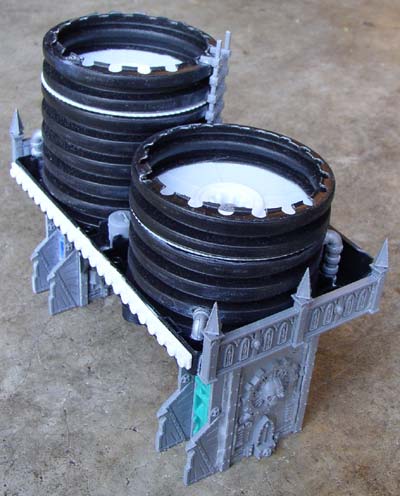
STC WATER TOWER
Part 3- Adding the details
Adding railings to both ends of the tape box helps conceal its origin.  Glue two sections of railing together, end to end, and add a post on the end to make a complete railing as pictured here.  Warning- the spikes on these railings look wicked sharp because they ARE.  You might want to sand the tips a bit to remove their skin piercing quality.  Or, if you're some kind of paranoid  hemophiliac, you can clip them off entirely, but it won't look as cool.

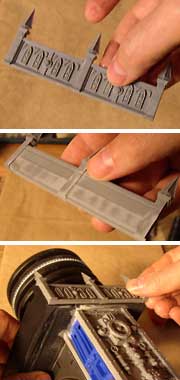
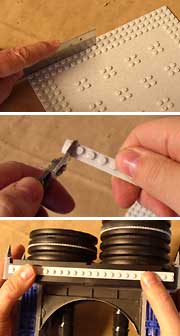
Be sure to sand the back side flat, at least along the bottom.  This helps the glue stick better.


Add some superglue to the back and place it on the short side of the tape box.  Line up the bottom of the railing with the bottom of the box.  Do this for both ends of the tape box. 


Now to add the main pipes.  These are just sprinkler riser pipes, cut to the right length.  Start by cutting off the short threaded end with a razor saw.  Cut right against the edge of the hex shaped ridge- this provides a large flat area on one end of the pipe, ideal for gluing.  Sand this end flat on the sanding pad.

Next, you'll need to mark the right length to cut the pipe.  Use one of the building panels to measure the correct length,  and use a silver sharpie to mark the pipe all the way around.

Now, using a razor saw, cut the pipe.  Note that the threads run at an angle, so to cut the pipe straight, you'll need to cut across the threads somewhat. 

Check the pipe length by test fitting it underneath the water tower- it should easily fit between the bottom of the tape box and the ground.  If it doesn't, sand the end some more on a sanding pad until it does. 

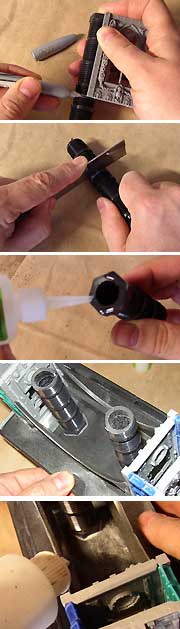
Add superglue on the hex end of the pipe, and glue it to the bottom of the tape box, about a half inch in from the inner building panel.  Repeat for the other side, so you have two main pipes coming down underneath.


For extra strength, run a bead of superglue around the joins and dust with baking soda to set the glue.


Remember those eagle buttresses?  You can add them to the sides of the building panel bulkheads.  Sand the edge to be glued for maximum contact.  Check alignment while gluing and try to keep the buttresses straight and parallel with the building panels.  Adding all four buttresses to just one side of the water tower creates a nice asymmetry that looks pretty good from most angles (see pics below for an example).
 

Now for the tank wheels.  Glue one wheel inside the recessed area of each tape reel for a nice bit of extra detail on the top of the water towers.
 

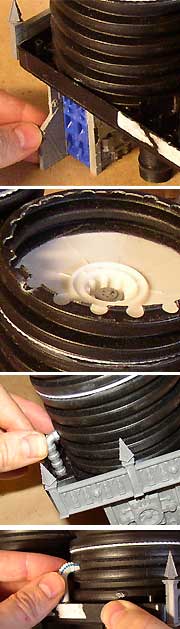
Adding some small pipes to the outsides of the tanks really helps sell the image of a water tower.  If you have access to the Imex Chemical Plant model kit, the pipes are perfect for the job.  Try to cut the pipe lengths so that the elbows meet the tank centered over one of the ridges.  I put one of these pipes in each corner of the tower.
 

You can also use bendy straws instead if you like.  Bendy straws are easy to install but hard to paint- try to find black straws if you can, most party supply stores carry straws in various colors.  You can use the little reel pins that are inside the tape box to align your straws.  Cut the lengths so that the bend fits in between the ridges on the tank.

To add some detail to the long sides of the tape box, start by cutting a strip of "studs" off of a Lego base plate.  I used a Megablox base plate since they're cheaper and the plastic is easier to glue and paint.  Hold your razor saw along the edge of a row of studs to get a nice straight cut. 
 

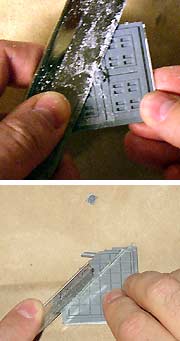
Once you have a strip, check the length and trim it down with a saw or cutters to the right length.
 

Sand the back of the strip and superglue it onto the length of the tape box edge.  Repeat for the other side.  Note that the side with the door is taller- line up the strip however you like, though centered looks good.
 

To create a small platform for models to stand on within the tower, grab a section of building floor that just has a skull on it.  One of the damaged floor sections is fine, as long as 3/4 of the floor is intact.  Saw the skull off of the floor if you like- this side will be glued face down, so you can save the detail for another model and it helps ensure a flat surface for gluing.

Next, flip the floor plate over and use the grid texture to line up a nice 45 degree angle just past the corners (as shown in the picture) and saw off the damaged corner of the plate.

Now test fit the plate in between the water tanks- it should rest snugly in the triangular space on the door side of the tape box.  Glue the sawed edge to the inside of the tape door (See pic below).

Add the ladder to the taller of the two tanks.  You'll want to trim off the lower set of pegs so the ladder can rest flat against the tank.  Glue the ladder onto the side of the tank, above the floor platform.

And the finishing touch- assemble the round ammo cannister, and saw it in half, forming two shortened cylinders.  Take one of these cylinders and test fit it into the slot in the tape box, opposite the floorboard.  It should fit snugly into the slot there- just glue it in place, and you're done!

Note that slight variations is ok, or even encouraged- it makes your water tower unique!  Tank height, placement and height of the small pipes, buttress placement- all of these factors are flexible, plus you may come up with some variations or additions of your own.

Next:  Painting the Water Tower

Copyright 2006 Sean Patten

Previous Page
Back to the How-To pages
Back to Industrial scenery
Back to Necromundicon