 STC WATER TOWER
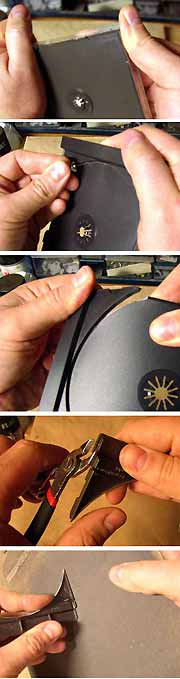
Notice that one side of the tray has a wide raised edge on it.
Take a push pin and score along the inside of the recessed curve on that
side. (Scoring means dragging the point of the pin along the plastic
to gouge out a groove in the plastic). Score it several times for
a nice deep groove.
Now the fun part- gently bend the tray along the score line, starting
at one edge and working your way around until the curved portion snaps
off. If you scored nice and deep, the tray should snap apart easily
along the curve. You've just created an arch!
Note that a little bit of a lip protrudes out on the side edges of the
tray "arch"- cut these little nubs off with nippy
cutters or a razor saw.
Now sand the side edges smooth on a sanding pad. You'll be gluing these side edges later, so the flatter they are, the better. Repeat all of the above steps for both CD cases, so you end up with two arch pieces.
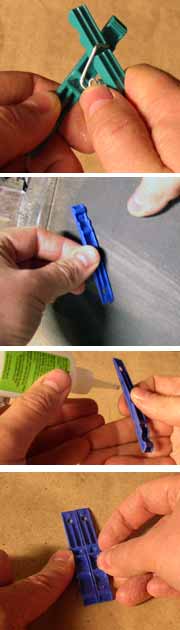
To seperate the clothes pin halves, just grab both sides and twist gently
until the spring piece is loose, then remove it.
Next, be sure to sand the HECK out of the sides of the pin halves.
The flatter they are, the easier they will be to glue.
Add a bead of superglue on one side of a pin half. Then press
a second pin half against it, making sure they are lined up evenly.
Place them down on a flat surface while the glue dries. This keeps
them flat and straight.
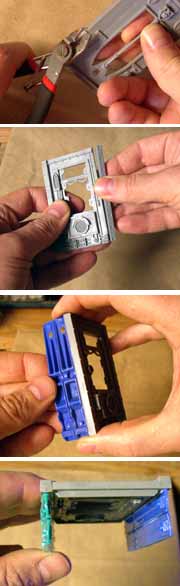
Next, glue a bulkhead onto the open side of each building panel, so
they are symmetrical.
Now the fun part. Glue your pair-o-clothespins to the inside edge
of the building panel. Do this for both sides, then glue another
building panel on the opposite side of the clothes pins.
Essentially, you're making a rectangular box out of two building panels
and two sets of clothes pins. This part is tricky- keep checking
your box from the ends so you can see if everything's lined up. It's
easy to let things get lopsided, so take your time and be sure your superglue
is set before moving on to the next step.
You'll need to make two of these boxes, using all four clothespins and all four building panels. Remember that two of the panels will form the inside walls of the tower, so choose which ones you want on the inside and put one on each box.
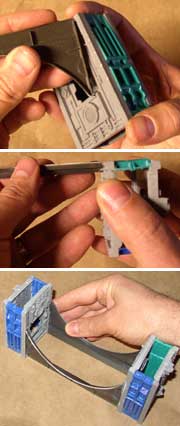
Superglue the edge of the arch to the top of the bulkhead, with the
arches' cool ridged detail facing outward. Check your alignment frequently-
this is one of the hardest steps!
Repeat with the other arch piece on the other bulkhead, then glue the other ends of the arches to the bukheads on the other box. At this stage, it helps to set the whole assembly upside down on a flat surface (as shown here) for stability and to make it easier to check alignment.

For extra strength, I recommend adding a bead of glue all along the
edges where the supports meet the box. Hit the glue with a light
dusting of baking soda to set it. Don't
worry about small gaps- you won't see underneath here, you mainly want
to glue it for strength.
Once the glue is set, flip the box over and test fit the water tanks- notice how the 3" drain pipe fits right into the tape reel slots! Add a bead of glue to the bottom of the tanks and glue them in place.