 STC WATER TOWER
Part 1- Construction begins
Okay, we're making a Water Tower! First things first, materials.
You will need:
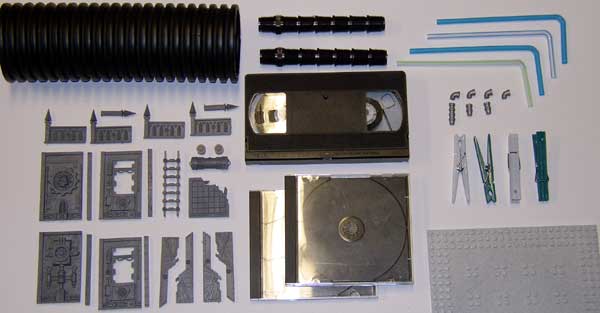
CITIES OF DEATH BUILDING PARTS
Yep, the new Games Workshop "Cities of Death" buildings are beautiful.
We're making use of that beauty for this project. You'll need:
+++ Four building panels (I chose some from the Manufactorum sprue)
+++ Four bulkheads (the long thin pieces with rivets on them)
+++ Four railings (I chose the spiky kind), and two extra spikes
for the end of the railings
+++ One Ladder
+++ Four buttresses (I chose the Eagle style)
+++ One piece of floor (damaged corner variety is okay)
OTHER GAMES WORKSHOP PARTS
+++ Two small tank wheels from a Chimera / Lemann Russ / Basilisk kit
+++ One of the round Ammo cannisters from the Battlefield Accesories
Sprue
FROM THE HARDWARE / DIY STORE
+++ Two Pop-up Sprinkler Risers. These black 1" Diameter plastic
tubes have a series of threads on them. They're cheap- usually about
15 cents apiece.
+++ A length of 3" ribbed drain pipe. Be sure it's the 3" diameter
and not the more common 4". You can get an 8 foot long piece
for about five dollars.
HOUSEHOLD GOODS
+++ One VHS video tape. Any length will do.
+++ Two empty CD cases.
+++ Four plastic clothes pins, 3" long
+++ Lego base plate (Or similar brand- I used one from Megablocks)
+++ Four Bendy straws. OR, a nice alternative to the bendy straws
are four pipe elbows and 3 short pipe sections from the Imex
Chemical Plant kit.
TOOLS
+++ Small Phillips screwdriver
+++ Razor Saw
+++ Sanding Pad
+++ Superglue
+++ Scissors
+++ Hole Punch (Standard size)
+++ Silver Sharpie (or other brand metallic marker)
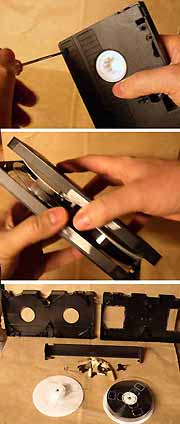 |
Let's start by disassembling that VHS tape. Be sure to rewind
it first. Use a small phillips head screwdriver to remove all the screws
from the bottom of the tape. If the tape has a label, slice it down
the seam.
You should be able to pry open the tape at this point. Remove
and save all the contents. Go ahead and seperate the door, remove
all the metal springs and rollers, and most importantly hang onto the tape
reels.
Here's what you get when you open up one of these guys. We won't
be using all the little bits, but you can hang onto them for your bits
box. If nothing else, they make great scrap for your junkyard or
Ork terrain! |
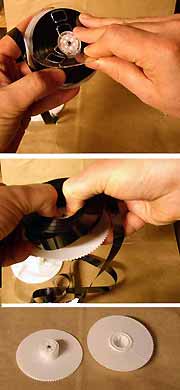 |
Next, prepare the reels. Hold the back firmly and bend the clear
front upward until it snaps at the hub. Do this for each of the spokes
until the clear part is removed.
If you remembered to rewind, all the tape should be on one reel.
Place your thumbs on the hub and use your fingertips to pry under the roll
of tape. If you can work the roll of tape off the hub, it's a lot
easier than making a giant mess of unraveling the tape (though some folks
are easily amused by this activity- whee!)
Cut the tape where it meets the hub (or just pull on it until it pops
out- the little clip might pop out, but that's fine, you won't need it.)
|
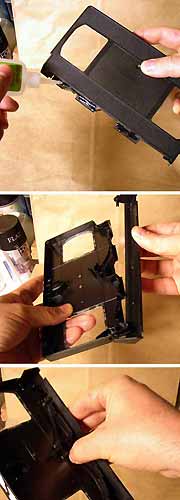 |
Grab the tape case half with the windows on it. You may want
to sand down the ridges on the outside face of the case half. It
will make later assembly a lot easier if it's flat- the glue will stick
better to a flat surface.
Now grab the tape door. You'll be gluing them together, but first,
test-fit the door back on. You'll need to line up the pins on the
door with a hole on one side of the tape case and notch on the other.
Once you have a good fit, run a bead of Superglue
along the front edge of the case where the door meets it, and add the door
back on. Hold the door in place until the glue dries.
You now have a nice rectangular box that will hold the water tanks (once
you build them that is!). |
 |
Grab a length of that 3" ribbed drain pipe. You'll be making
two water tanks out of it.
Each tank is made from two sections of pipe. The short section
should be two ridges high. The long section can be any length you
like (Typically between 4 and 8 ridges high).
To cut the pipe, use a Razor Saw and
saw near the edge of a ridge. Sand down the cut with a sanding
pad- this gives you a nice flat edge to glue to.
For the short section, leave a bit of length of pipe sticking out from
the upper ridge, and trim it down with a pair of scissors to give a clean
edge. This will form the top edge of the water tank. To keep
the scissors lined up while cutting around, keep the tip of the blade pressed
up against the inside of the ridge. |
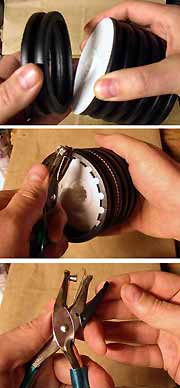 |
Now for each water tank, grab a tape reel and sand around the edges.
Now superglue it to one end of a tall pipe piece, with the hub pointing
in. Next, glue the short pipe piece on top of the reel.
Now grab a hole punch and punch out half circles along the top edge
of the fuel tank. Space the holes about a half inch apart.
If the hole punch won't reach far enough in, you might be able to remove
the little catcher door off the bottom of the punch to get it out of the
way. Depending on the punch, you might find leaving it on or removing
it gives the perfect length for nice consistent hole depth. |
NEXT:
Construction continues...
Copyright 2006 Sean Patten

Previous Page
Back to the How-To pages
Back to Industrial scenery
Back to Necromundicon