
Sand the cut edges smooth on your sanding pad.
The top of the ball has some text imprinted on it- sand this text smooth
so it won't show on your turret.
Now for the tricky part. To get everything to line up, you'll
need to trim a strip out of the middle of the half-ball, creating two smaller
quarter sections that are used on the turret.. This will remove two
wiffle slots, leaving three slots per side. Draw parallel lines over
the top of the ball, with about 5/8" space between them.
Carefully cut along the lines with scissors. Note that the plastic
is pretty soft, and scissors give you more control and a cleaner edge than
sawing.
Be sure to keep your cuts parallel- you should remove a strip of plastic
from the middle of the ball that is the same width all the way along.
Here are the two quarters, ready for mounting.
The soft plastic of the Wiffle ball is perfect for pushing out rivets.
Use the 1/16" hole punch and squeeze gently to push some nice round rivets
out of the plastic.
I added a line of rivets along the inner cut edge, and six rivets
around each slot. The bottom edge is mostly obscured during mounting,
so don't bother putting rivets down there.
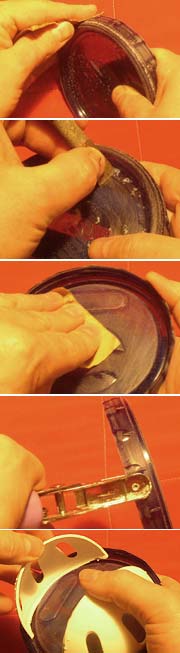
To ensure a better bond later when gluing, use a hobby knife to scrape
away the raised text around the top of the lid.
Even the inside of the lid should be sanded, especially down along the
inside edge where it screws on as this is where the Wiffle ball quarters
will ultimately go.
Once again, the 1/16" hole punch can be used to create rivets.
I added two rivets between each ridge on the lid. Be sure to punch
from the inside out, so the rivets appear around the outside edge.
Now you can test fit the dome quarters if you like (you don't have to glue them yet). Note how, with just a little bit of flexing, they fit nicely into the recessed areas around the inside of the lid.
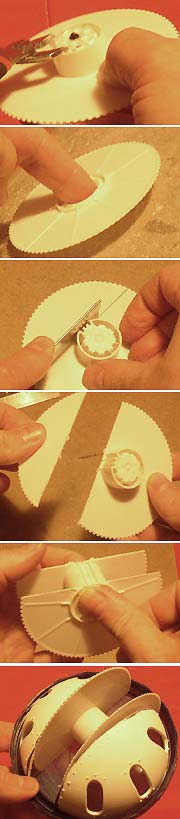
Then sand the hub's inside surface smooth on the sanding pad.
Now, using the hub as a guide, saw a straight line across the reel with
your razor saw. Start slow and keep the cut as straight as possible.
Remove the smaller piece you cut away. Repeat these steps for
both reels so you have a matching set.
Now glue the two reels together with the hubs facing in, putting glue
on the hubs first. Be sure to keep the straight edges lined up- if
you need to, flip it over and rest it on a flat surface as the glue dries.
Now you can test fit the Mantle in between the dome quarters. Don't glue it yet- we'll add the cannon to the mantle first.

Here's the two resulting pieces.
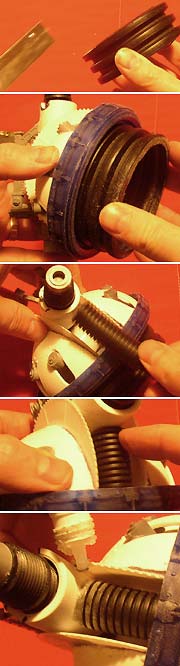
Next, sand down the two PVC couplers.
You'll need to cut down one of the PVC couplers so it's only 1 inch
long. Measure from one end and mark it.
Cut it down with a razor saw. NOTE: The PVC is hard to cut,
and tends to bind. Lubricate the razor saw blade by rubbing both
sides with some chapstick.
Sand down the cut end on your sanding pad.
To give the cannon a more gothic look, we'll notch out the ends of the
couplers. Using a Sharpie, mark both ends of the long coupler with
three half round notches, as shown here. Mark the uncut end
of the shortened coupler too.
Using a Dremel moto tool with a metal drum bit, grind out all nine notches.
If you don't have a moto tool, you can do a rough clip out with nippy cutters
and smooth the notches out with a small half-round file.
Trim off any rough edges or burrs with a hobby knife.

...and push it into the notched end of the short coupler until it stops.
Next, apply glue to the other end of the riser, and push on the long
coupler until it stops. Make sure to line up the notches on the two
couplers, before the glue dries!
Now apply glue to the end of the 2-section riser, and push it into the
other end of the long coupler as shown.
Take the medium sized tank wheel and pop the guide pin out. This
will form the muzzle of the cannon.
Apply glue to the end of the short riser and press the tank wheel onto
the end, with the hole facing out.
The muzzle should now look like this.
Now for the back of the cannon. You'll need to bevel the inside
end of the short coupler. Use a hobby knife to shave a nice 45 degree
edge around the inside of the coupler.
Now you'll find that the generator cover (that half-round piece from
the Manufactorum sprue) will fit nicely into the end of the coupler.
Glue it in place, facing up (the same direction as the notches).
Now glue the large tank wheel to the end of the generator cover, rivets
facing out.
Finally, glue half an oil drum onto the face of the short coupler, below the generator cover, as shown.

Now to add the struts. Take the Buttress pieces and cut off the
skull detail at the top with a razor saw.
Next, sand the ends of the buttresses on your sanding pad, at a slight angle (one to the left and one to the right). This helps them to match up with the curved surface of the barrel without flaring out to the sides too much.
Tack the Buttresses in place with superglue so that they span
between the two couplers, and fit comfortably inside the mantle.
To reinforce the bond, add a bit more superglue around the points of contact
and blow a bit of baking soda dust on them to set the glue and fill any
gaps.
Sand the back of the two skull vent details...
...and glue them to the bottom of the buttresses for a more finished
look.
With the cannon assembly finished, it is now time to assemble the turret. Test fit all the parts together on the inside of the Ziploc lid as shown. Then, glue the cannon and mantle to the lid.
Now add glue to the edges of the wiffle ball quarters and press them
into place again. By gently squeezing them together against the tape
reels, you should get a decent bond- at least enough to tack everything
in place.
For a stronger bond, add a bead of glue along the points of contact and blow a bit of baking soda onto the glue. This helps the glue set faster and fill any gaps.
Finally, it is time to add the small tank wheels. Try pressing a tank wheel into one of the slots, near the top of the slot. If it doesn't go in easily, use a hobby knife to carve out just a tiny sliver curve of plastic from the inside edge of the slot. You'll want to press the tank wheels in about halfway, and have them facing out roughly parallel with the curved surface of the wiffle ball.
Now add a drop of glue at the point of contact to glue the tank wheels
in place (again, a light puff of baking soda can help build up the bond
here).
Then glue the drain pipe to the Ziploc lid (now the bottom of the turret)
as shown.
Now to hook up a power cable to the cannon. Grab the ribbed flex
tubing and hold it up to the front of the turret, under the barrel of the
cannon. Eyeball the length needed to run from the barrel down to
the inside of the Ziploc lid. Cut off a section this length with
your razor saw or a pair of scissors. Note that it's better to cut a bit
too long than too short...
Now shove the section of tubing under the barrel. It is pretty
flexible and should compress a bit to fit snugly in place. Note that
the slit in the tubing should be faced inward so it is not visible.
Now tack the tubing in place with a few drops of superglue at the ends where they contact the barrel and the lid. The turret is now finished!