 STC DEFENSE LASER
If you built yourself a Water Tower, a lot
of this will sound very familiar. On to the parts list...
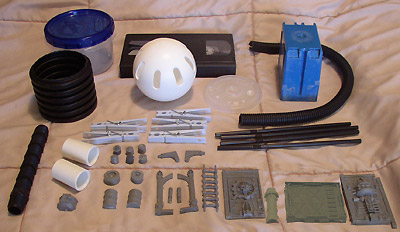
CITIES OF DEATH BUILDING PARTS
+++ Two building panels (I chose some from the Manufactorum sprue)
+++ Two bulkheads (the long thin pieces with rivets on them)
+++ Two Buttresses from the Basilica sprue
+++ Two of those little skull vent details from the Basilica Sprue
+++ Two Eagle brackets from the Floor / Generic sprue
+++ One Ladder from the Floor / Generic sprue
+++ One half pipe section from the Manufactorum sprue
+++ One generator cover (the short, half-round thing) from the Manufactorum
sprue.
OTHER GAMES WORKSHOP PARTS
+++ Six small tank wheels from a Chimera / Lemann Russ / Basilisk kit
+++ One medium and one large tank wheel from the same sprue
+++ Two oil drum halves from the Battlefield Accessories Sprue
+++ One Necromunda Bulkhead. If you can't find any, you can substitute
another building panel from the Cities of Death sets, plus one more plastic
ladder.
FROM THE HARDWARE / DIY STORE
+++ One Carlon B122A Switch Box. This blue plastic electrical
box is should be nearly 3 1/2 inches tall. These usually have 2 nails
on them, I already cut them off in the picture above.
+++ A length of 3" ribbed drain pipe. Be sure it's the 3" diameter
and not the more common 4". You can get an 8 foot long piece
for about five dollars.
+++ One 1/2" x 6" Cutoff Riser. These black plastic tubes
have a series of threads on them and can be found with the lawn sprinklers.
They're cheap- usually about 15 cents apiece.
+++ Two 3/4" PVC pipe couplers.
+++ A length of corrugated flex tubing, 1/2" Diameter.
This flexible, ribbed plastic tubing is also sold in electronics stores,
and usually is slit down one side since it is used for keeping wires tidy.
HOUSEHOLD GOODS
+++ One VHS video tape. Any length will do. The cheaper
the better.
+++ One Ziploc brand Twist' N Loc Container, small size
(16 oz / 2 cup). A three pack costs around three dollars.
+++ One Wiffle Ball (softball size), found in toy stores.
You want the official Wiffle brand.
+++ Four Bendy straws.
+++ Four or five Plastic Clothespins. (You can also use wood
ones, but they aren't as detailed).
+++ One Jack in the Box Medium Drink lid.
+++ (Not Pictured) A plastic lid from a 16 oz. cottage cheese / sour
cream tub- should be the same diameter as the Ziploc container.
TOOLS
+++ Small Phillips screwdriver
+++ Razor Saw
+++ Sanding Pad
+++ Superglue and Baking Soda
+++ Nippy Cutters
+++ Scissors
+++ Hole Punch (Standard size)
+++ Hole Punch (1/16" size, available at crafts stores)
+++ Hobby Knife
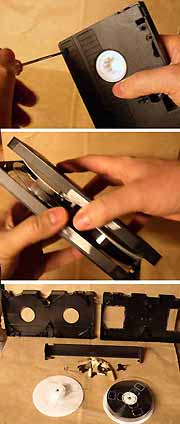 |
Let's start by disassembling that VHS tape. Be sure to rewind
it first. Use a small phillips head screwdriver to remove all the screws
from the bottom of the tape. If the tape has a label, slice it down
the seam.
You should be able to pry open the tape at this point. Remove
and save all the contents. Go ahead and seperate the door, remove
all the metal springs and rollers, and most importantly hang onto the tape
reels.
Here's what you get when you open up one of these guys. We won't be using all the little bits, but you can hang onto them for your bits box. If nothing else, they make great scrap for your junkyard or Ork terrain! |
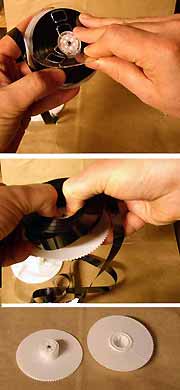 |
Next, prepare the reels. Hold the back firmly and bend the clear
front upward until it snaps at the hub. Do this for each of the spokes
until the clear part is removed.
If you remembered to rewind, all the tape should be on one reel.
Place your thumbs on the hub and use your fingertips to pry under the roll
of tape. If you can work the roll of tape off the hub, it's a lot
easier than making a giant mess of unraveling the tape (though some folks
are easily amused by this activity- whee!)
Cut the tape where it meets the hub (or just pull on it until it pops out- the little clip might pop out, but that's fine, you won't need it.) Set these aside for now- we'll come back to them later. |
 |
The Defense Laser consists of a main platform, and a turret.
We'll start working on the main platform first.
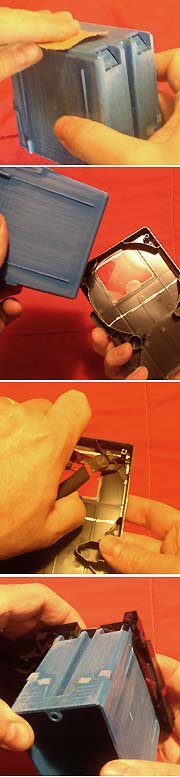
Start with the electrical box. Saw off the nail tabs with your
razor saw. File the cuts down smooth, and sand all the surfaces of
the box.
The box will be glued to the inside of the VHS case (the half with the
windows). The area where the box goes is marked in silver in this
picture- some of the plastic inside the VHS case will need to be trimmed
down to allow a good fit.
Use your nippy cutters to remove any plastic ridges or posts that get
in the way of where the box will go.
Test fit the box, and once it fits cleanly, glue it in place as shown.
|
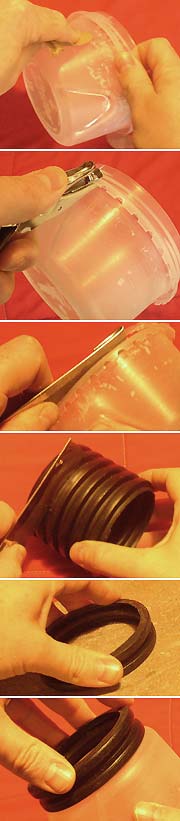 |
The Ziploc container forms the other main component of the platform.
Remove the lid (save it for later), and sand down all outside surfaces
thoroughly with some medium grain sand paper. Sanding the surfaces
makes it much easier to glue and paint- otherwise, this kind of plastic
is much harder to work with.
Now with your standard hole punch, punch out notches around the edge
of the flange that rings the container. Try to space the notches
out evenly.
Next, saw off the threaded rim. Use the flange as a guide for
your razor saw. Sand down the face of the flange to clean up any
ridges left behind after sawing.
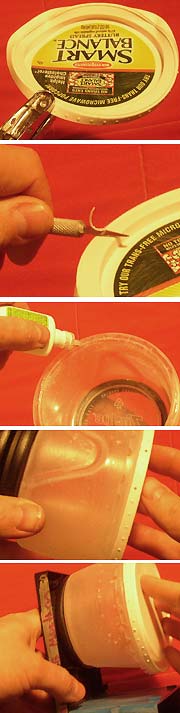
To help the container attach to the VHS case, we'll use some ribbed
drain pipe. Use your razor saw to cut off a short section, 2 ridges
tall. Press the saw up against the side of the ridges as a guide
while cutting.
Now take the sawed off section and sand both ends smooth.
Finally, glue one end of the pipe section to the bottom of the Ziploc container. For extra strength, run a bead of superglue around the outside where the two pieces meet. Then dust them with a bit of Baking Soda to set the glue and help fill any gaps. |
 |
To match up to the height of the electrical box that forms the other
part of the platform, a bit of height needs to be added to the Ziploc container.
This is where that plastic lid comes in. I used the lid from a Margarine
Tub that was the right diameter to match up with the Ziploc container.
The soft plastic lid is a good candidate for... rivets! Using the 1/16"
hole punch, you'll find you can gently squeeze a "rivet" up out of the
plastic. Be sure the hole side of the punch is on the outside of
the rim and the punch side is on the inside. Don't squeeze too hard
or you'll punch a hole. Just squeeze until you can see the rivet
head start to push up.
Make sure the lid is sanded for a good bond to the container.
There was a ridge on the lid I was using, so I shaved it off with a hobby
knife.
Apply glue to the face of the container's flange.
Slap that lid on! The top of the lid contacts the top of the flange
for maximum surface area and a good bond.
Now you can attach the whole assembly to the VHS case. The drain pipe should fit right into the VHS case where the reel used to be. With luck, the height of the container assembly should match the height of the electrical box. If needed, trim down the lid edge to match them up so the platform sits flat and stable and doesn't wobble.
|
 |
Now to make the top of the Platform out of the other half of
the VHS case (the one with the holes in it). Use the standard
hole punch to punch out notches around the edges of the case. Note
that the cheaper the VHS case, the thinner the plastic, and the easier
it is to punch out.
Let the shape of the case be your guide when determining where to add
notches, and when you have room, just try to space them out evenly along
the edges.
Now the top case half gets glued to the bottom. Apply glue to
the high areas of the bottom half since they will be the point of contact.
Then add the top, taking care to line up the edges as straight as possible.
To add some detail, we'll make a rivet ring out of the Jack in the Box
lid. Use scissors to carefully cut around the ring of rivet-like
bumps on the lid.
Then place the lid on a hard cutting surface, and use a hobby knife
to trim away the lid material inside the rivet ring.
And now you have a rivet ring, ready to glue.
Add glue to the bottom of the ring and carefully position it in the
center of the VHS case ring- the one over the electrical box. (The
other side is where the turret will go).
|
Copyright 2007 Sean Patten
![]()