
Add a bulkhead to the blank side of the panels so the sides match.
Now take an oil drum half and using the ridge detail as a guide, cut
1/3 off the end of the drum.
Add the cut down drum half to the side of the electrical box that faces
out (opposite the Ziploc container). Glue it over the lower left
corner.
Now take the half pipe piece from the Manufactorum sprue and glue it
right above the drum, forming a long pipe detail.
Next we'll add the Necromunda bulkhead (if you don't have one, skip
ahead a bit). Start by sawing away the outer flanges from the panel-
use the inner flange as a guide for your razor saw to get a nice cut.
Cut the flanges off both sides, and the cut edges smooth.
Now you can glue the panel in place, next to the pipe added earlier.
Note how the Necromunda bulkhead's built in ladder provides access to the
platform above.
If you don't have any Necromunda bulkheads, you can use another Cities
of Death building panel as shown here. Glue a ladder next to the
building panel to provide access to the platform above.

Next, cut down a bendy straw so there's about 3/4" of straight straw
above and below the bendy part. Bend it into a slight S shape as
shown here. Now slot it into the notch in the electrical box, behind
the building panel. Clip the top off level with the top edge of the
VHS case.
Hold the top end against the VHS case and glue in place as shown.
(The end result can be seen in the picture below, on the right side).
The next pipe will run horizontally along the underside of the VHS case.
Use your standard hole punch to notch out holes for the straw to run into.
Cut a straw down to length as pictured here, and extend the bendy portion
out by pulling on either end.
Slot the straw through the punched holes in the case and glue in place.
Finally, glue one Eagle bracket per side, to the edge of
the side building panels, near the top and facing towards the Ziploc container.
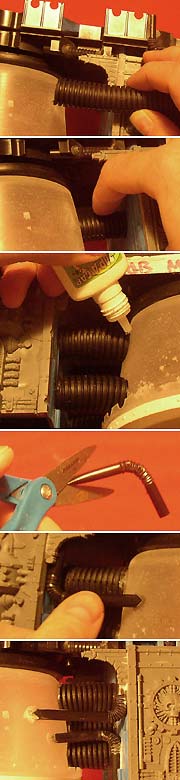
Stuff the length of tubing into the space between the electrical box
and the Ziploc container. Try to center it in the middle.
Now continue to cut more lengths of tubing and push them in place until
you have a satisfactory number of them crammed in there (I put in five).
Note that the tubing near the outer edges will need to be a bit longer
than the one in the center, to account for the curvature of the container.
Remember to face the slit in the tubing inward so it is not visible.
Now, add a couple drops of glue to all of the contact points and set it
in place with some Baking Soda.
A fewBendy straws will add even more detail in here. Cut the long
end of a straw at a slight angle as shown here, with about an inch and
a half of length to the bendy part.
Now hold the angled end against the container and bend the pipe up behind
the eagle bracket. Glue the two ends of the straw to hold it in place.
Reinforce the bond with a bead of superglue and baking soda if needed.
You can also run straws down to the ground as shown here. One
or two straws per side should be enough to get that tangled power cable
look!

Now for those plastic clothespins. Start by seperating the pins
into two halves by twisting the ends away from each other and working them
out of the spring.
To get better contact when gluing (later), use a hobby knife to shave
down the ridges on the back of the clothespin (particularly the middle
one). You can sand the back of the pin on a sanding pad for good
measure. (Ignore this step if using wooden pins).
Now, using the spring notch on the back of the pin as a guide, saw straight
across the pin.
You should end up with a short piece and a long piece as shown here.
Now to glue the pins to the container. Make sure the more
detailed side of the pin is facing outward when you glue them on! Start
next to the ladder, working your way around the container as shown..
Start with a short piece, then a long one, alternating as you go.
Hang in there, you're almost done!
Keep adding long and short pin pieces until you get to your power cabling
on either side. For extra strength, run a bead of superglue down
the sides of the pins and dust them with some baking soda.
And that's it! Place the turret into the VHS case, above the container.
Don't glue it on or else the turret won't turn.
Your finished Defense Laser should look something like this. Now
get some paint on it so you can get it into action!