![]()
BASIC CONSTRUCTION
Once it was confirmed that I was indeed being contracted by WizKids to make a table for them (and would even be paid for it), I went to Home Depot and picked up materials for making the basic table:
4'x8' x 1/2" plywood sheet- one of these
2"x3" x 8' lumber- five of these
2 1/2" long galvanized drywall (wood) screws- a big box of these
Because I don't have a lot of space in my garage, there was no way I could make a full 4X8' table in one piece. So I cut the plywood in half with a circular saw. Be sure to mark your line clearly and cut straight! This left me with two 4'x4' squares. I also cut the lumber down- 4' lengths to run down the sides, and 3' 10" lengths (to fit between the sides) for the ends. I also ran a couple 3' 10" cross boards to add strength. These I turned flat, so the whole thing could be set down over a folding table and have a nice drop edge all the way around (though I don't think they set it up this way at the convention).
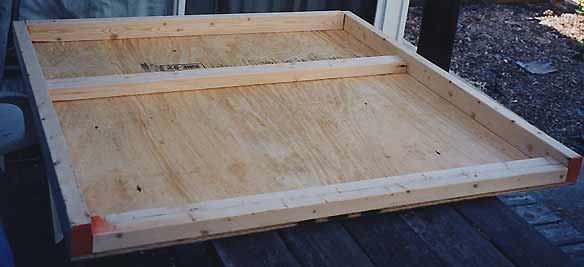
This is one of the two halves, all screwed together. To connect the two halves together, I drilled holes laterally through the crossbeams where they'd meet in the middle so you could bolt the two halves together. Not strong enough for transport (it flexes too much if you try to pick it up), but enough to keep the table lined up nicely and stable during normal play (with gamers bumping into it, etc).

BASIC TERRAIN
With the two halves assembled, the next step was to start adding terrain. I had decided on a rocky desert theme, with some industrial refinery buildings and pipeline on it. To build up the rocky areas, I used sound dampening board. I got a 4' x 8' x 1/2" sheet of it at Home Depot. This stuff is made of shredded, pressed paper. (Some acoustic ceiling tiles are made of the same stuff). Originally I was going to get insulation foam (what most people use for this sort of thing), but they didn't have any.
As it turns out, this stuff is very cool- even better than the foam, for three reasons:
1. You can tear it with your hands or with pliers and get nice,
ragged edges- perfect detail for rocky terrain.
2. If you paint it with white glue (PVA glue), it becomes as
hard as rock.
3. It takes spray paint well, and doesn't "melt away" like foam.
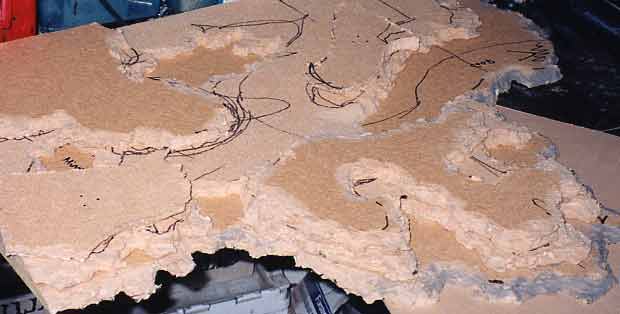
I began tearing out nice shapes for hillsides and cliffs, building them up in layers (as seen above). I glued the layers together with plenty of white glue. Then, to attach it to the table, I used white glue, and screwed it down with wood screws to keep it from warping until the glue dried.

To keep the screws from pulling right through, I made anchors out of plasticard (a quick 1" square with a hole drilled through it). The sound board tends to warp up at the edges, so I screwed it down near the edges. I left the anchors in, since I knew I'd be covering them up with rocky crags.
(NOTE: By this time, several of my friends were able to help out with the construction... Thanks to Chris Cates, Robert Calfee (and Mari!), and Ed Huettl for making this thing happen in time for Gen Con!)
GLUE COAT
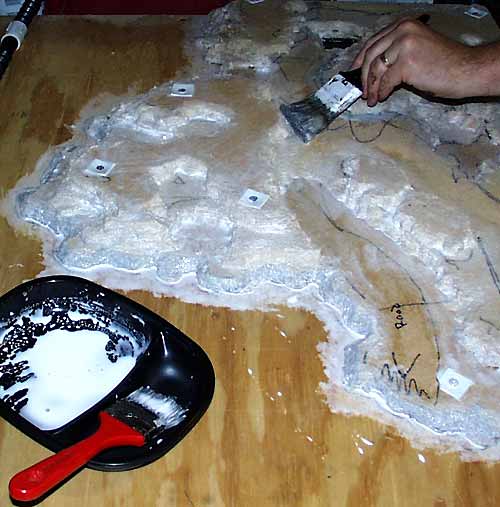
Because the sound dampening board is pretty soft, especially where it has been torn away, all the edges got a heavy coat of white (PVA) glue. We didn't even bother to thin down the glue, we just brushed it straight on (thinned glue just takes longer to dry anyway). To preserve the rocky texture, it helps if you "stipple" the glue coated areas by dabbing the end of your brush on them. This pulls out high points that make it craggy and rough. If you don't stipple, the glue tends to mat down the rocks, leaving a smoother, less detailed finish.
We even brushed a coat of glue onto the outside edges where they met the table edge, so they'd withstand the wear and tear that any table edge recieves. Once the glue had dried, the edges were so hard that they were actually sharp to the touch (ow!). We removed these razor sharp edges by rubbing them down slightly with a wire brush.
NOTE: don't bother glue coating the top (flat) areas of the sound board! When the glue dries, it only forms a thin skin that peels away from the board far too easily. We surfaced the sound board using a different method (more on that later...).
On to Part 2: Rocks and Roads
See the completed Mechwarrior Table
Back to the How To pages
Back to Necromundicon