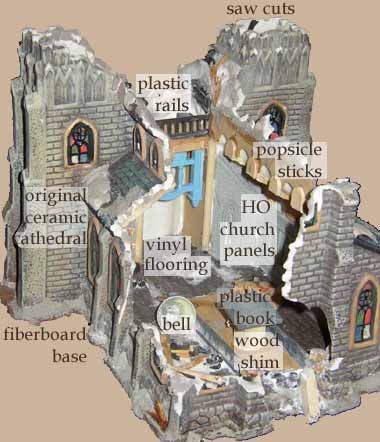
THE CHAPEL, AFTER CUTTING AND DETAILING
CLICK HERE TO SEE THE PAINTED CHAPEL (use your
BACK button to return here).
Most of my Mordheim buildings are made from porcelain "Christmas Village" buildings. You can find these in stores like Joann's Fabrics or Hallmark- be sure to stop by after Christmas, as they can go on sale for as low as 75% off! Also, Wal-Mart carries a selection of these around the holidays, reasonably priced at about $10 apiece. To get the most out of your porcelain building, you really want to open it up. Not only will it make a more convincing "ruin", but you can make use of all that interior space for game play! I use two techniques for opening up these buildings. I recommend method 2 at this point, but read on...
MAKING HOLES- when making your holes, leave enough room that you can get your hand in there (and not just the mini!). Going too big can weaken the structure though (especially with porcelain buildings), so find a good balance when smashing holes. BE SURE to sand or file the edges to dull them down- they can be razor sharp otherwise, leading to game-interrupting injuries!
METHOD 1-- SMASHING IT WITH A HAMMER (very carefully, mind you). Porcelain likes to break in big, sweeping curves which look awful for ruins. Try to gently chip away at the very edge of your initial break- strike at an outward angle to flake off bits instead of creating huge cracks. Then glue some of the shards back on with PVA (white) glue, build up areas with concrete patch, and form support beams inside made of wooden craft sticks and stir sticks to help hold it all together. This method is unpredictable and at times frustrating, so consider method 2...
METHOD 2-- CUTTING IT WITH A BIG SAW (this can be very dangerous if done wrong btw). After several failed attempts at cutting porcelain with a dremel cutoff wheel, I decided that maybe all I needed was more POWER. I recently aquired a 7 1/4" circular saw for about $60. So, I bought a stone cutting blade (for masonry, etc) for my saw, only about $4! The stone cutting blade looks a lot like a giant version of the dremel fiberglass cutoff wheel. My first victim would be the chapel (pictured below). I started by cutting off most of the roof, including the pointed tower tops. This is a MESSY, NOISY operation- be sure to do this outside, with eye and ear protection! You'll generate tons of dust and sparks, so try not to scare the neigbors. Clamp the piece in place so it doesn't move, and hold the saw with both hands. Take your time- try to score your cut line before gouging in- if you torque it too much, the porcelain may shatter.
Once you have the roof off, you can go back and "rough" up the edges by cutting little notches, nicks and slices into the edge.
EDGING
The most important thing after making your holesis to try to get the
edges to match the original "material" of the building. Wood should
have splintered edges, so glue in some interior wood framework with snapped
off edges (popsicle sticks work well for this). Roofs break along
tile lines, so glue some loose tiles on along the edge to break up the
shape. Concrete patch is great for making
debris piles, covering over smooth "snow" areas so they look like ash,
and roughing up the edges of breaks.
BASING
If any big pieces broke off during the cutting / smashing process,
you can reattach them with PVA (white) glue. It's a good idea to
glue a piece of cardboard or thin wood to the inside surface to help hold
the two pieces together. One way to strengthen your building
(especially if it broke and you had to glue it back together after making
your holes) is to glue it down to a fiberboard
base. Use PVA (white) glue or concrete
patch to do this.
THE CHAPEL, AFTER CUTTING AND DETAILING
CLICK HERE TO SEE THE PAINTED CHAPEL (use your
BACK button to return here).
ROOFS
If you left any roof on your building, be sure to glue some supports
to the inside, broken off at the edges. These can be simple crossbeams,
or elaborate arched details as seen in the picture above. Popsicle
sticks work well for roof support beams.
INTERIOR WALLS
The interior walls are usually pretty lumpy and featureless on the
porcelain buildings. You can use wood paneling to help smooth them
out. The Chapel interior was built up using panels from plastic HO
scale model train church building. I cut the panels to fit and glued
them on with concrete patch.
FLOORING
Adding a detailed floor to the bottom level of your building will make
it look much more realistic, and probably play better too. Start
by filling in any holes or low spots (usually near the walls) with concrete
patch. Do this after you've based the building so the concrete patch
doesn't leak out the bottom. My favorite material for the ground
floor is textured Vinyl- you can usually find it in small rolls along with
the Christmas Village decorations, as they often use it for roads.
Sand the back of the vinyl and glue it down with CA glue. You might
also be able to find textured wallpaper with a nice pattern- use PVA (white)
glue.
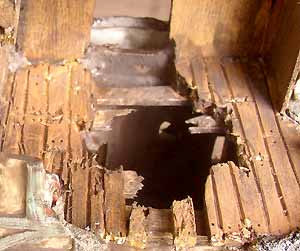
For the upper stories, a wood floor looks best. I discovered a quick way to make convincing wood floors using wood Shims (strips of wood used for leveling door frames). Shims are cheap, and come in consistent widths (usually about 1" wide). (They are wedge shaped, but you won't notice once they are cut down and installed). Use the wide end for thick floors. The wood is quite soft, and if cut to the right length, can usually be friction fit in place to represent a second story floor. Once you have enough strips fitted to span the entire floor, use a needle file to score board lines into the wood. You can even add nail holes with the tip of the needle file. Don't forget to add cross lines occasionally to represent varying board lengths. Then you can use nippy cutters to break away parts of the boards, creating gaps, splinters and holes in your floor. Now glue the strips in place with PVA (white) glue. You can also use concrete patch on the underside to bond the wood to the wall. If you made any big holes in the floor, glue some crossbeams underneath- popsicle sticks work well for this. The crossbeams can be damaged or broken too! Below is an example of a hole in the floor (between two scored shims) with broken popsicle crossbeams glued underneath. Note the wood panel walls too- these are the thin end of the shims, cut to fit and glued against the interior walls with white glue!
DETAILING
Once your walls and floors are in, you can add rubble and other details.
Rubble can be built up using wood splinters, gravel and sand, concrete
patch, and any other bits you have lying around. Other fun elements
to include are skeletons, rats, discarded household goods, crushed furnishings,
carpets, pictures, etc. The Chapel interior was detailed with
a fallen bell (a plastic Christmas tree decoration), a Pulpit (made from
a Heroquest wizard's table sawed down to size and stuck on a small wooden
post), a wooden frame arch over the doorway (made from a Playmobil toy
bed headboard), and various debris.
The house pictured below was hard to detail, since it had a tile roof.
I bought some half-round wood from the craft shop (dollhouse section) and
cut it into short lengths to represent scattered tiles all over the ground.
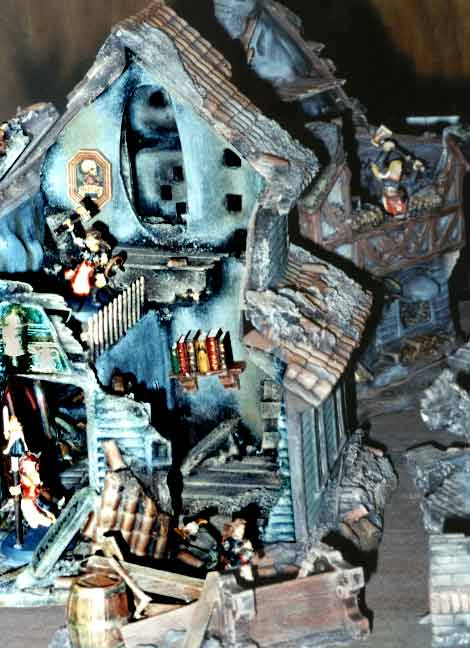
The interior is well built up, with a wooden floor (made from
craft sticks and balsa wood), and stairwell railing (HO train picket fence).
Detailing includes a picture on the wall (Picture frame from the Playmobil
line of toys, with a print of a Blood Angels banner from an old catalog
pasted on). The bookshelf was made from a craft stick and slices
off some moulding (dollhouse again). The books are from a Playmobil
toy. I painted the books and shelf before installing them.
PAINTING
Often the original colors of the porcelain pieces aren't bad.
I recommend spraying the interiors black, but for the exteriors,
you can darken them and flatten them by giving them a dark brown
enamel wash all over. Then, by drybrushing various shades of grey,
brown, tan, green, and blue, you can bring out the interiors and add detail
to the exteriors. Rooftops can be a wide range of colors depending
on material, and wood exteriors are often painted, allowing a wide range
of colors. Stone tends to be grey and bare wood brown, so these materials
paint themselves.
Ruined Buildings Page
Back to Mordheim scenery
Back to the How-To pages
Back to Necromundicon