 STC VENTILATOR

Then glue the extracted skull detail onto the top of the 90 degree elbow pipe for a bit of added detail!
Next, grab that juice drink lid, sand the top and bottom so it will
glue better, and keep it handy.
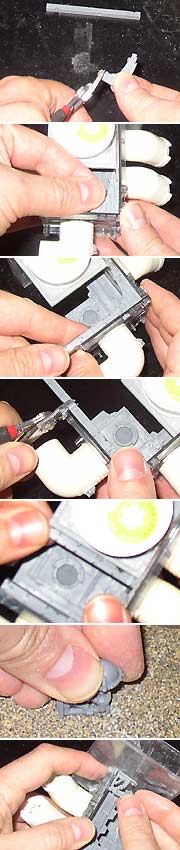
Around the neck of the juice bottle, you will often find a plastic ring
that snaps free of the cap when the cap is removed. Using whatever
tools work best (I use my teeth of course), carefully pry this ring off
the bottle, by working your way around and pushing upward. (If you
get desperate, you can cut the top of the bottle off and slide the ring
off from there). If you are lucky (as I was with this Welch's bottle),
you'll find that the ring has some hidden detail folded underneath itself.
Take advantage of this detail by gluing the ring onto the top of your bottle
cap, forming a raised lip of detail.
Next, you can add more surface detail to the cap by gluing whatever
you like inside. I used a spare large tape reel I had from another
dismantled cassette, and added a small reel below the notch.
Finally, glue the bottom of the cap to the floor plate (I usually glue
to the smoother side). This whole assembly can now be glued up inside
the Ventilator. Line the panel up so that it fits in the corner formed
by the tape box and the upper tape case. I like to position it so
that the cap sticks out just a bit past the edge of the tape case.
Now glue the eagle bracket into the back outside corner of the assembly,
opposite the juice cap, as shown here.
Next, glue a bulkhead strip to the inside wall right below the eagle
bracket.
Once the glue is dry, clip off the excess bulkhead with nippy cutters.
The remainder of the bulkhead can be glued adjacent to the floor panel
(with the juice cap on it) to form a nice finished edge as shown here.
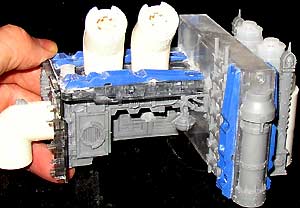
Now grab the globe lamp piece and sand the top edge flat on your sanding
pad.
This enables you to glue it into the front inside corner, forming a bracket between the roof and the tape box as shown here.

Sand the backs of the clothespins so they glue better.
Two of the clothespins halves can be glued to the rooftop as shown here,
for extra detail. If they are a bit too long to fit, trim off a little
with your Nippy cutters. You should be able to fit them in on either
side of the vents, as shown here.
Add two more on either side of the tape box, at the long end.
Now sand down the inside of the pipe half and glue it onto the end of
the tape box.
Once the glue is dry, you can trim down the excess protruding clothespin
with nippy cutters. Once clipped, sand the ends lightly with sandpaper
to smooth them out.
Finally, Add one more clothespin to the end of the tape box opposite the pipe half, and clip it down as well.

Now glue it in place on the tape box, between the clothespins and the
roof.
To prepare the side vents, start by sanding one side of the 3/4" PVC
couplers flat, opposite any raised ridges on the side of the coupler.
This will help it make better contact with the flat tape box. You
can also sand the ends smooth if they have any rough spots.
Next, prepare the water bottle pop top lids by removing the pop top
(yes, I used my teeth again, sadly). Sand the bottom edge of the
lid and add glue to it.
Press the lid onto one end of the PVC coupler- do this for both lids
and couplers to make two side vents. You can add extra glue around
the edge if you're worried about strength.
Remember sanding the side of the coupler flat? Now add glue on
that side and glue it to the tape box, about a half inch in from the short
end of the box. Glue the second coupler on the same way, right next
to the first.
The flying buttresses will frame these side vents, but first you'll
want to carefully saw off the round grid detail off the "inside" sides
of the buttresses for a better fit.
Don't let that detail go to waste- glue the round grid details onto
your rooftop vents as shown here for an extra bit of industrial flavor!
Now you can glue the buttresses in place against the tape box, on either
side of the side vents. Be sure to glue the bottom of the buttresses
where they contact the side vents, for extra strength.
And finally, that tiny little detail piece from the Basilica sprue (I call it an exhaust). Glue it to the short side of the Ventilator, offset from the pipe, for a hint of industrial detail.