 STC VENTILATOR
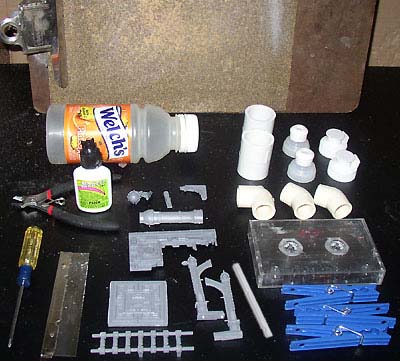
The Ventilator is made from an audio cassette, some plumbing fittings, a few simple household goods, and a small handful of Cities of Death parts. Note that you can build a Left or a Right handed version of the Ventilator (or one of each!), dicatated by which Manufactorum panel you use. Your ventilator doesn't have to be exactly like this- if you want to substitute your own detail pieces or modifications, please do.
Before you begin construction, take a quick look through the steps to
get an idea where you're headed, and feel free to refer to the finished
assembly pictures during construction to see where this madness ultimately
leads to.
CITIES OF DEATH BUILDING PARTS
The Ventilator makes use of some often overlooked parts from the
Cities of Death sprues.
+++ One Manufactorum building panel (one of the damaged window style
ones)
+++ One intact floor panel (any type- the hatch style was used here)
+++ Two flying buttress pieces (from the Basilica sprue)
+++ One Ladder
+++ One pipe half (from the Manufactorum sprue)
+++ One bulkhead (the narrow strip with rivets on it)
+++ One globe style light
+++ One small eagle support
+++ One small exhaust detail (from the Basilica sprue)
HARDWARE
The following parts can be found in the plumbing section of most
hardware / DIY stores.
+++ Two PVC pipe couplers, size 3/4"
+++ Two CPVC 45 degree elbows, size 1/2"
+++ One CPVC 90 degree elbow, size 1/2"
HOUSEHOLD GOODS
+++ One audio cassette tape, with box
+++ Four plastic clothes pins, 3" long
+++ One juice bottle Lid (and the snap ring below the lid). Note
that the Welch's 16 oz. juice bottles have great snap rings!
+++ Two pop-up water bottle tops (also known as "sport" tops).
If you can't find these, you can use two snap-open Dishwashing liquid
tops instead.
TOOLS
+++ Razor Saw
+++ Sanding Pad
+++ Superglue
+++ Nippy Cutters
+++ Small Phillips Screwdriver (if your cassette tape has screws)
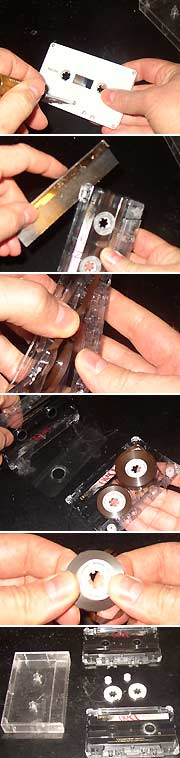 |
The first step is to disassemble the Audio Cassette. First, remove
the tape from its box. Note that squae boxes generally look better
than rounded ones, so keep that in mind when selecting fodder for this
project.
If the tape has screws, disassembly is easy- use a screwdriver to remove
all 5 screws.
If the tape doesn't have screws, it is most likely snapped together.
To open it up, use your razor saw to cut into the four corners. Follow
the seam between the two halves as you cut.
Once the corner pins have been cut, pry the two halves apart from the
bottom. Be gentle, as the acrylic plastic used in most tapes is extremely
brittle.
Once you've split the tape in two, remove the gel sheets, tape reels,
and other loose parts. Be sure to save the small guide reels.
To extract the large reels from the tape, press gently from behind to
pop the reel out of the tape roll. Then pull the leader end of the
tape to the side until the little reel clip pops out. You won't need
the clip. Throw out the tape and set the reels aside.
Here's the components you should hang onto once disassembly is done:
Tape box, two Cassette case halves, two small guide reels, two large tape
reels.
|
 |
Now construction begins. Start by clipping off the raised ridge
from the side of one of the tape case halves.
Then sand that edge of the case half flat by rubbing it lengthwise on
your sanding pad.
Apply some superglue along the sanded edge.
Now grab the other case half and line it up along the edge with glue
on it to form a 90 degree angle. Note that the case halves
have a raised edge on one side (where the tape used to go)- I kept these
facing the same way when gluing the halves together.
Next, prepare the Manufactorum panel. Use your nippy cutters to
trim off the exposed pipe along the "damaged" edge of the window, to clean
it up a bit so it looks more intact.
Next, sand the long edge smooth on your sanding pad, and the bottom
edge too, to ensure good contact when gluing it in place.
Apply glue along the sanded edges, and position the panel against the tape halves as shown. Note that the raised edges on the tape case halves acts as a guide for placing the panel- nestle it up against the edge of the raised areas for a nice, straight fit. |
 |
While you're waiting for the glue to dry, you can prepare the tape
box. Swing the box door open. Add just a drop of glue to the
sides of the door, right above the hinge, and a couple drops along the
top edge of the door, and then close the door shut. This should keep
your box sealed tight for greater strength.
Now it's time to trim down the tape case halves. Place the assembly
on a flat work surface (not your good placemats!) and grab your razor saw.
Hold the saw up against the short edge of the Manufactorum panel, perpendicular
to it, and gently saw a nice straight line into the tape case.
If you're patient, you can saw all the way through. If not, be
sure to at least cut into the edges, and then bend the case on either side
of the cut until it snaps along your cut line.
Now flip the assembly around and repeat the cutting process for the
other side. You should end up with one long side (this will be the
"roof") and one short side (the "short wall").
To clean up any rough edges from cutting (and snapping), hold the edges
perpendicular to your sanding pad and sand them straight.
Now for the bendy pipe bit. Grab the 1/2" CPVC 90 degree elbow,
and sand the ends smooth.
Stand your tape case assembly upright, with the roof piece level to the table. Apply glue to one end of the elbow, and place the other end on the table and slide it up to meet the "short wall" (it should cover up the hole in the tape case). Hold in place until the glue sets. Now you can glue the roof piece to the tape box, forming the other wall. Stand your box on the long edge. Add glue along the sanded edge of the roof, and slide it over until it makes contact with the box as pictured here. Be sure the roof is level. NOTE: You may want to keep the Cities of Death floor panel handy for this step- it should just fit between the table and the "roof" piece if held on edge. Eventually you'll glue it in place, but for now just use it as a guide. |
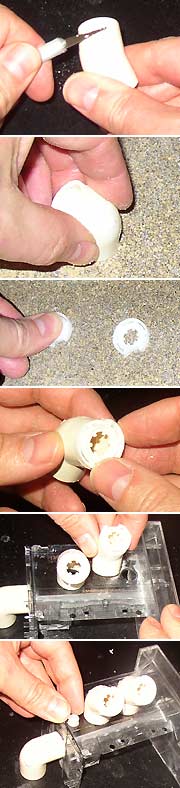 |
Next, we'll make the rooftop vents. Grab the two 1/2" CPVC 45
degree elbows and examine them for markings. If they have any markings
that seem inappropriate for terrain (like, NIBCO 1/2" USA), you can scrape
these markings off with a hobby knife or metal file.
Sand both ends of the elbows smooth.
Now grab the large tape reels and lightly sand both sides to ensure
that glue (and paint!) stick to them.
Glue the tape reels to one end of each elbow. I like to put the
notched side upward, but do whatever feels right to you.
Now you can glue the elbows onto the "roof" of your Ventilator building.
I glue the outer one over the outer hole in the tape case, and the inner
one against the edge of the inner hole of the tape case, leaving the inner
hole exposed.
As a finishing touch, feel free to glue one of the small reels next to the outer vent as shown here.
|
Copyright 2007 Sean Patten
![]()