 STC PLASMA TOWER

You may find that some of the panels or razor handles are bumping up
against the taller pieces of the tape case that forms the platform floor.
Feel free to trim down any pieces that get in the way, for a smug, level
fit.
The tower makes most of its contact with the inside surfaces of the
platform. Put your glue along those sides and shove your tower into
place.
While the glue dries, you can start putting the railings together. One side of the railing is made of two sections, the other side is made of two sections with an end post added. Start by filing the ends of the railings smooth where they will contact other pieces for a good fit. Then apply glue along the ends, and on a flat work surface, slide them together and line them up neatly.
Now glue the 2 panel railing onto the short side of the platform. Attach it to the outside of the tape case half that forms the floor, and line up the side with no post with the corner of the tape case. You may find that sanding the rivets off the backside of the railing panels gives you better contact when gluing them on.
Next, glue the 2 panel railing with endpost onto the back side of the
tape case, such that it lines up with the other railing and forms a corner.
Now to attach the ladder. Clip off the lower two posts off the
back of the ladder.
You should be able to fit the ladder snugly against the front side of the platform, with the right side of the ladder running along the right edge of the front double arch piece. Glue along this contact edge. If the ladder posts extend below the bottom edge of the platform, clip them short so the platform sits level.

Now for the razor heads. Holding by the edges, carefully sand
them on a sanding pad, face down. Then glue one on top of each window
panel, making sure to face the blade side IN towards the bottle.
This way the blades aren't exposed.
Add the lamp to one of the razor handles that faces the tape reel side
of the platform. You can fit it right into one of the slots the logos
occupied if you had any. Sand the back smooth and clip down the top
and bottom of the mounting bracket for a better fit.
Now for all those vents, skulls and lights we sawed off the back of
the building panels.
The arch pieces from the tape casette will still have several tubes
protruding from them. Glue a light over the end of each of these
to make them look like vent pipes.
The small skulls (from the backside of the window frame) can be added
at the top edge of the ridges on the upper bottle for some extra detail.
The large skulls can go on the lower bottle, centered above each razor
head.
Use the vents to add detail to the front face of the platform.
Two per flat section looks pretty good.

To add the rivets, pick them up with the tip of a sharp hobby knife,
dip the back side in a small drop of superglue (just a dab- don't submerge
it or it may not come out!), then press the rivet into place on your model
and it should stick in place.
Add rivets along edges, at corners, or anywhere you want more detail,
using care to maintain some symmetry for a more realistic look.
The Tower's nearly done! Here's a picture of the whole assembly, before priming. But wait- this thing's supposed to light up, right?
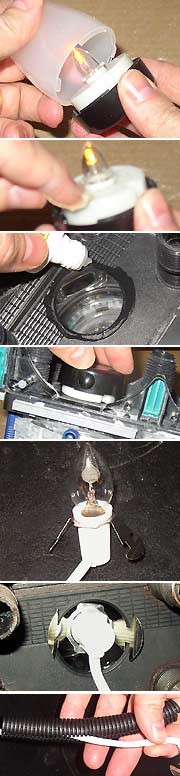
There are many ways to light the Plasma Tower. The easiest is
to use a battery operated tea light. If the light has a cover, pop
it off.
Sand the top surface of the light so it glues and paints easier.
Add a ring of glue around the bottom of the hole below the tower.
Press the light into place and hold it until the glue sets. Be sure to line up the button with one of the sides, for easy access. Note that the battery door is usually on the bottom of the tea light, so you should still be able to get to it after gluing in place.
As an alternative to tea lights, why not try some flicker bulbs? Flickering flame bulbs have a special element unlike normal bulbs- two flat metal plates coated with a dark grey powder that glows orange when electrified. You can usually find flicker bulbs in crafts stores or in the decorations section of some department stores during Halloween.
Flicker bulbs are about the same size as night light bulbs, and they fit into C7 type sockets (the large outdoor Christmas lights, for example). However, the light up porcelain Christmas Village decorations also use C7 size bulbs- I picked up some extra cords made for Christmas Village displays at the local hardware store during the holiday season. The metal clips on these lights are meant for the village buildings, but fit perfectly in the tape reel hole!
To help hide the wires running from your terrain, pick up some ribbed plastic wire sheath (used for bundling wiring for stereos, etc). You can find it in electronics stores or even hardware stores.