HOUSEHOLD GOODS
You'll need these easy to find items to build the Plasma Tower.
 STC PLASMA TOWER
The Plasma Tower is made from two videocassettes, two different size Gatorade / Juice bottles, some plastic razors, and the Cities of Death plastic building panels. Lighting is provided by a battery powered tea light, or if you prefer, a flicker bulb.
Before you begin construction, take a quick look through the steps to
get an idea where you're headed, and feel free to refer to the finished
assembly during construction to see where this madness ultimately leads
to.
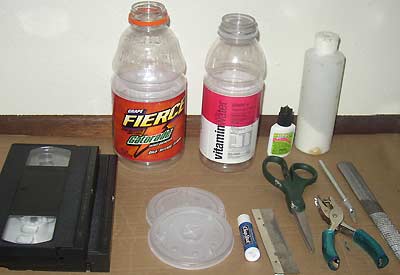
HOUSEHOLD GOODS
You'll need these easy to find items to build the Plasma Tower.
(pictured above)
+++ Two VHS videocassetes
+++ One 32 oz. Gatorade bottle (Juice bottles will work too)
+++ One 20 oz. Gatorade or Juice bottle
+++ Two Jack in the Box drink lids (the small ones with the little
bumps on them)
(pictured below)
+++ Six plastic disposable shaving razors (hard plastic ones are best)
+++ Four plastic clothes pins, 3" long
+++ One battery operated Tea Light
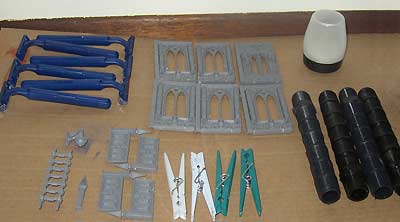
CITIES OF DEATH BUILDING PANELS
The Basilica and Floor sprues contain the parts pictured below.
+++ Six building panels, preferrably windows
+++ Four Railing panels and one extra end post
+++ One Ladder
+++ One lamp (half round globe style)
HARDWARE
The following parts can be found in the garden section of most hardware
/ DIY stores.
+++ Three 3/4" Sprinkler Cutoff Risers (four pictured- the black tubes
with ridges on them)
TOOLS
The following tools will be a big help for this project:
+++ Superglue and Baking Soda
+++ Razor Saw
+++ Metal File
+++ Nippy Cutters
+++ Hobby Knife
+++ Scissors
+++ Standard Hole Punch
+++ Pliers
+++ Sandpaper
+++ Small Phillips head screwdriver
+++ Pushpin
 |
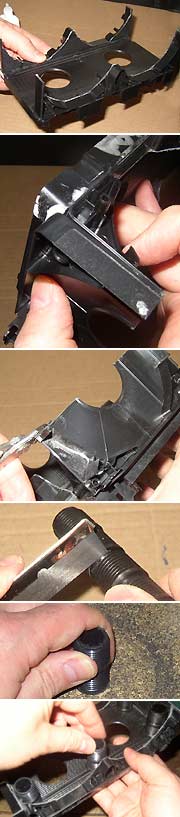
First, disassemble the VHS tapes. Remove all 5 screws from the
bottom of the case. Then pry the case open and remove the tape reels and
the front door. Pull all the small parts and springs out of
the two case halves. Repeat this process for both tapes. We'll
make arches and a floor plate out of these tape shells. Notice that
each tape shell has a back end, where the tape label used to go, and a
front end, where the door used to be.
Take one of the tape shells (the half with the clear windows on it)
and saw it down to size with a razor saw. There should be a raised
ridge down the center of the shell between the two windows. Use this
ridge as a guide for your razor saw and cut along the side closest to the
front end (where the door was). You won't need to cut all the way
through- just score it out to the edges, then cut through the edges.
Now you should be able to snap the shell in half along the score line.
Don't worry if it isn't perfectly clean.
Now notice that the inside of the shell has curved ridges to keep the tape reels in place. Using a pushpin, score along the bottom of the curved ridges all the way around, following the curves all the way down to the edge on both sides. (Scoring means scribing or gouging a line). NOTE: Some tapes have a more pronounced curved ridge than others- it really helps to find tapes that have a solid ridge to help guide your scoring. Now using a pair of pliers, gently snap the plastic away from the inside
of the curve, leaving the curved ridge behind. It helps if you start
at one edge, and work your way around, twisting the plastic away from the
ridge. You should be left with a double arch shape (you can see it
better in the pictures below). Make two of these double arch pieces
from the two clear window shell halves.
Now to make the shorter arches. Grab one of the tape shells with
the round holes in it. Cut the case so that half the hole is on either
side of the cut, as shown in the picture. You may find ridges that
can help you cut a straight line across both sides of the hole. Repeat
this cut on the other side, giving you two short arches. You can
throw the center portion away, or keep it for your bits box...
The other shell with two holes in it will form the floor of the Plasma
Tower. This picture shows the two double arches and the two short
arches that will be glued on to support the floor piece.
|
 |
To assemble the platform, start by gluing the two double arch pieces to the flat surface of the floor shell. Be sure the detailed insides of the arches are facing outward, and just line up the outer edge to the outer edge of the floor piece as shown. Next, glue the short arches onto the ends. Put glue on the ends
of the double arch pieces as this is where the largest contact point is.
The short arches can slightly overlap the floor piece, just don't glue
it on too high as we'll be adding railings there later. (Notice I
used some baking soda here to help the superglue set faster).
Once the short arches are on, use nippy cutters to clip off any plastic
sticking out past the bottom edge, so the base will stay flat and not wobble
when placed right side up.
We'll use sprinkler cutoff risers to add more detail and bulk to the
underside of the platform. Count back two big ridges from the end,
and cut behind the big ridge. Count back two ridges more and cut
off another piece. Repeat this for all three risers, yielding six
little pipe pieces.
Sand the ridge end of the pipes flat with a sanding pad or metal file.
Now glue the six pipes to the underside of the platform. Glue
one to each of the 4 inside corners, and the last two go behind the center
point of the big arches as shown.
|
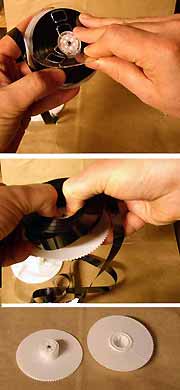 |
Now, grab one of the tape reels and carefully snap off the clear side
of the reel by gently bending up close to the hub at the three contact
points.
Now to get the tape off. Pry under the tape with your fingers,
gently working it off the white tape reel. Then pull out the tape
where it connects to the hub- a small plastic clip may come off the hub,
but you won't need it.
Here's what the stripped down reel looks like. You'll only need one of these, so if you want to save the other three for other projects, go for it. |
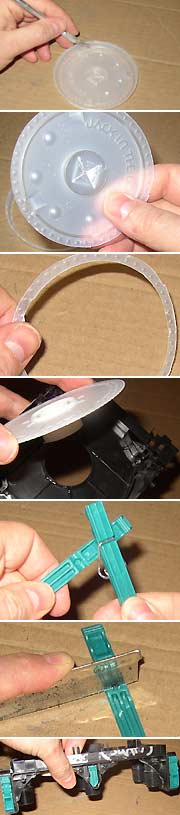 |
Now to solve the mystery of the Jack in the Box drink lid! If
you found the correct type of lid, you'll see a ring of bumps around the
top of the lid. Those are about to become rivets. Grab a hobby
knife, flip the lid upside down, and using the grooves as a guide, carefully
trim away the outer edge of the lid. You can actually hold the hobby
knife in place and spin the lid around to cut it if you're clever!
Now repeat the process again, cutting along the inside groove to remove
the inside of the lid. This leaves behind a nice ring of rivety detail
goodness!
Glue the rivet ring onto the flat side of the tape reel. Then
glue the other side of the tape reel to the platform, dropping the protruding
reel hub down through the hole. If the platform's door side is facing
away from you, glue the reel through the hole on the right. Note that the
best point of contact is the ridges around the hole, so put your glue there.
Now the final embellishment. Grab a plastic clothespin and seperate it by twisting it apart and removing the metal spring. Notice the groove where the spring was resting. For both halves of the clothespin, saw across that groove, splitting it into two pieces. Now glue the front clothespin halves onto the back of the platform, on either side of the double arch, as shown. Then take one of the tail pieces and cut it down to a point with your nippy cutters so that it fits into the hole in the middle of the double arch, pointing down. Using the other tail piece, you can do the same for the front of the platform if you want. |
Copyright 2007 Sean Patten
![]()