 STC GENERATOR
It's time to build! First things first, materials.
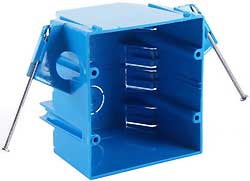
The main component for the Generator is a plastic electrical box you can
find at most any Hardware store. They are referred to as switch boxes,
outlet boxes, or new work boxes. The type you want is the 2-gang
Nail-on kind. The most common box of this style (and the one used
in this article) is manufactured by Carlon, model B232A-UPC.
Of course, there's a whole host of details we'll be adding to this box
to make it into something cool! Here's a list of the parts used.
Note that your generator doesn't have to be exactly like this- there's
some solid ideas for details presented here, but if you want to substitute
your own detail pieces, go for it!
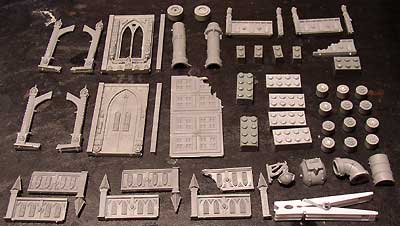
CITIES OF DEATH BUILDING PARTS
Most of the detail on this building comes from the new Cities of
Death sprues. The first three are essential to making the most of
the box's size and shape, so they are listed in bold.
+++ Two building panels (I chose some from the Administratum sprue)
+++ Two bulkheads (the long thin pieces with rivets on them)
+++ Six Spiky railings, and two extra spiky posts for the end of
the railings. If you prefer to use damaged ones, you may only
need one extra spike.
+++ Three Manufactorum railings, and two extra posts for them (one
of the railings can be a damaged piece since it gets cut down anyway)
+++ Four flying buttresses
+++ Two Straight Pipe sections
+++ One Bent Pipe Elbow (formed of two identical halves)
+++ One Light (I chose the dome shaped one)
+++ One of the curved cover pieces (that goes on the inside of the
Manufactorum panel with the skull on it)
+++ Two panels of Floor (intact or damaged)
OTHER GAMES WORKSHOP PARTS
+++ TWELVE small tank wheels from a Chimera / Lemann Russ / Basilisk
kit (You can mail order the Tank Wheel sprue seperately if you like- part
code 99399999043)
+++ Two large tank wheels from the above mentioned sprue
+++ Half of an Oil Drum from the Battlefield Accessories Sprue
HOUSEHOLD GOODS
Several Lego style building blocks are used in this project.
I prefer Megablocks brand, since there's no logo on the studs, and the
cheaper styrene based plastic is actually easier to work with than the
Lego ABS based plastic.
+++ Six building blocks, size 2x4.
+++ Four building blocks, size 1x2.
+++ One building block, size 2x3. A cut down 2x4 block could
also work.
+++ One plastic clothes pin, 3" long
TOOLS
+++ Razor Saw
+++ Sanding Pad
+++ Superglue
+++ Nippy Cutters
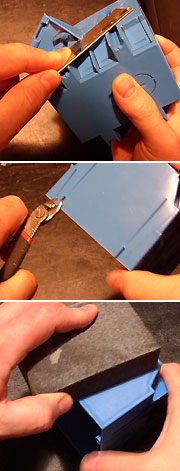 |
Before we begin, notice that the electrical box has four angled slots
on either side. These angled slots have punchout tabs- if you were
actually using the box for what it was meant for, you'd punch out the tabs
to run wires out of the back of the box. But we'll be relying on
these angles to provide some of the more interesting detail on the generator,
so leave them intact!
The first step is to cut off the nail tabs on either side of the box.
Use your razor saw and cut as close to the box as possible.
Next, trim off the little tabs on the front of the box with nippy cutters,
so they don't get in the way of the buttresses we'll be adding later.
Finally, use some sandpaper or a sanding block to sand all the surfaces
of the box. Sanding the box ensures that glue and paint stick to
the box better!
|
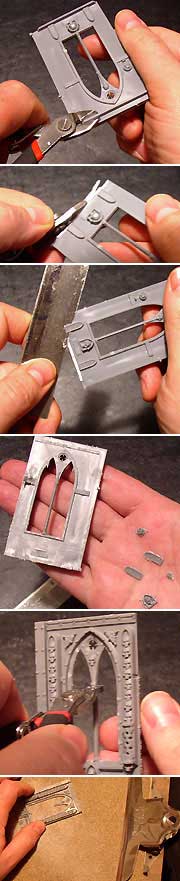 |
Now to prepare the building panels. To get a good, flat fit onto
the box, all the detail on the back of the panel must be removed.
Use nippy cutters to trim off the ridges on the top and bottom. Twisting
the cutters will help pry the bottom one off nice and flush.
Although you could use coarse sandpaper to burn off all the detail on
the back, try this trick. Carefully lay your razor saw blade flat
against the panel and saw the details off. If done carefully, you
can actually remove intact details that can be glued onto other models
wherever you like!
If you are using a panel with arched windows, you can clip out the center
strut to make it look more industrial- they often break off anyway, so
cut it cleanly with nippy cutters.
Once all the details you want have been removed, sand the back of the panel on a sanding pad until it is relatively flat and smooth. Repeat these steps for both panels. |
 |
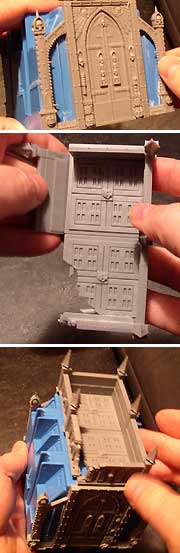
Next, we'll add a building panel onto the back of the box.
Line up the edge of the panel with the edge of the box top. Add the
bulkhead onto the right side of the panel and superglue it to the box,
forming a nice symmetrical edge. The completed panel should be centered
on the end of the box so it lines up almost perfectly with the flat portion
of the top of the box.
Two buttresses will go on either side of the panel. See the picture
below to see how this works. The bottom portion of each buttress
will stick out too far if it isn't flattened. (Note: Be sure you
are making a left-side and a right-side buttress when flattening the backs.)
Use nippy cutters to trim off the ridge at the bottom and a razor saw to
saw off the detail. Sand the back on your sanding pad, being careful
only to sand the lower portion of the buttress. The upper portion,
including the spiked skull detail, will stick out past the box, so be careful
not to sand off that detail!
Glue the buttresses on either side of the panels, as shown. Put glue on the flattened back of the buttresses, and on the edges where they contact the panel. The buttress may stick out slightly from the box at the top- that's okay, as long as they are lined up with the panel. |
 |
Now that the back of the generator is done, repeat the steps for the
front of the Generator. If you forgot to trim off the two little tabs at
the bottom edge when preparing the box, do that now so the buttresses lie
flat on the box. I used the administratum door panel for the
front of my generator, but you can use whatever panel you like.
Now for the roof. Glue the spiky railing pieces around the 2-panel
floor section as shown. I used some of the damaged railing
pieces, lining up the damaged edges with the damaged corner on the floor.
Be sure to put the raised detail of the floor panel facing up, so the bottom
is smooth and will glue easily.
Once this assembly is dry, superglue the whole thing onto the top of
the box. Center it on the box- you should find it is a good fit for
the box and lines up evenly with the panels on either end.
|
Copyright 2006 Sean Patten
![]()