DOCKS
Be sure to check out the RIVERS section too!
Check out the how-to page on making WATER

I've always wanted to play with water effects, and finally did so here.  The Docks is made from a large plastic Cassette Tape case, with a large channel carved out of it.  This way I can get a recessed look (where the water is lower than the "ground")  without cutting a big hole in my gaming table.  In the shot above, the docks are crawling with rats, plague marines, and worse!

To form the lower floor where the water would sit, I glued a big piece of fiber board to the bottom of the case after cutting the trough.  The walls of the trough were covered with plastic, then covered again with textured paper to get the "stone" effect. The Grating is made of a comb!   The tie-downs are made by gluing some mushroom shaped wood pegs onto plastic rectangles, with rivets added to the corners.  Wood bumpers were also added to the tops of the walls for more dockside details.   To get the flagstone look on the "ground", I scored the plastic with the corner of a razor saw and used a steel ruler to get straight lines, then painted each "square" a slightly different shade of grey to make them stand out.
 
  I had to paint the whole piece before I could pour the resin, especially the river bed.  I primed the bed black and the rest of the piece grey, then poured clear-cast resin with green dye mixed into it. 

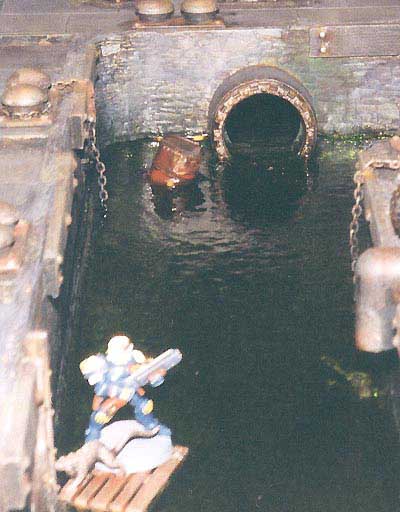
To get the "partially immersed" look on the oil drum, I glued the drum down at an angle to the bottom of the channel before pouring resin.  I poured two layers of resin, so between the layers I glued the palette (in the foreground, with rat and Arbite) to the first layer, then poured the second layer so the palette was partially submerged. To get the water ripple effect, I waited until the top layer of resin started to firm up, then rubbed it vigorously in circles to build up ripples in the partially cured resin.  Timing is tricky when doing this- too early and the resin will just pool flat again, too late and it has already set!

I had never poured something this large before, and the resin actually shrank as it cured, pulling away from the wall slightly (bummer).  It even bent one of the ladders that runs down below water level!  But the gap is small enough that it is hardly noticeable- if that's the worst thing that happens when pouring resin, consider yourself lucky.

In addition to providing percieved depth, the resin creates a convincing glossy surface once it cures fully.  I originally expected to have to add a layer of gloss varnish over the top of the resin, but did not need to- in fact, the trickle of water running down from the pipe is actually some resin I smeared up on the wall while pouring!
At the top of this shot, you can see a "pit" that goes down to water level.  The big pipe in front actually goes all the way through to the pit!  To make the pit, I built a box that went down to "bed" level, then before inserting the pipe into the wall, I cut a round hole in the side of the box and fitted the pipe to it.  Then I glued the box in, then glued the pipe in the wall and through to the hole I cut in the box.  Amazingly, it worked!  As I poured, the resin went through the pipe and filled the pit all on it's own.  The amazing thing is that I didn't have any leaks where the resin could seep out before curing- must be the massive amounts of superglue and baking soda I used during construction!

By the way, the rivet rings around the ends of the pipes are actually detail from the old Battlewagon plastic kit's wheels- I used a razor saw to shave off the outer rings and then mounted them around my pipes. 

Now, on to the Rivers!

Back to Mordheim scenery
Back to Necromundicon