FLAMES OF CHAOS
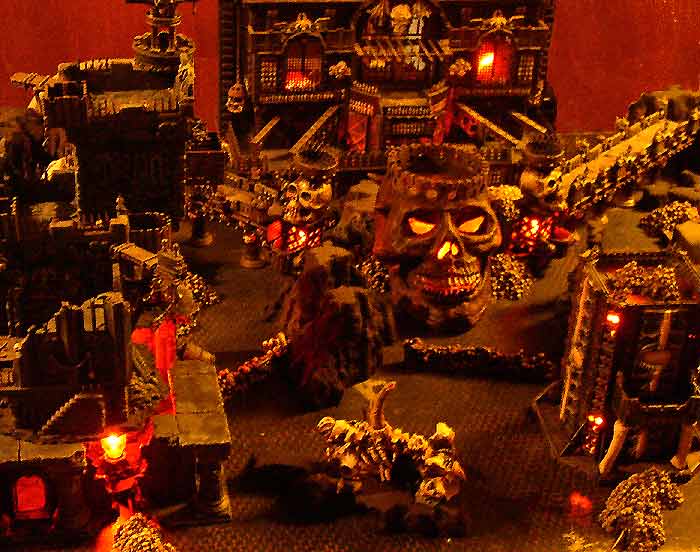
The last time I ran a Chaos campaign, I didn't know about flicker bulbs.
This time is another story! These bulbs produce a rippling orange glow
on the bulb element, much like a flame. (see below for
more info on flicker bulbs). Most of the terrain above is illuminated
with flicker bulbs. I even modified some of my existing terrain to
take flicker lights. The tower on the right is my Black
Tower, with holes drilled in it to allow light through, and a hole
cut in the bottom so I could put bulbs in there. I even cut a notch
in the base to make room for the wires (otherwise it doesn't lay flat on
the table, teetering on the wire instead). The other mod is the two
small Skull Towers (seen to the left
and right of the big skull described below). I just had to cut out
the bottom of the trellis columns to make room for the bulbs, and I also
added 4 small wooden cube "feet" to elevate them up enough that wires could
pass under the bottom edges easily. These look fantastic- the diamond
pattern on the trellis columns really lets the light shine through!
Click here
for another shot showing off the various skull towers, and featuring
Mage Knight Gate House pieces in the foreground.. I gave these pieces
a dark brown wash to tone them down, and cut notches in them to run wires
more easily, but they are stock pieces otherwise (and very nice ones too).
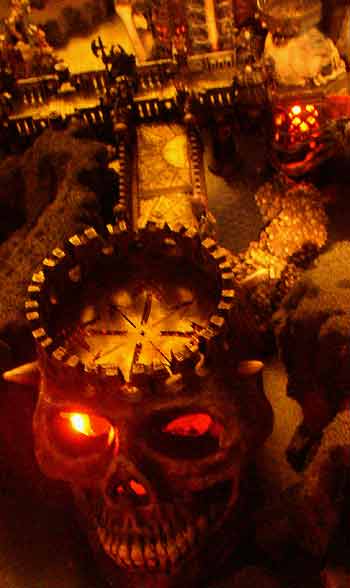
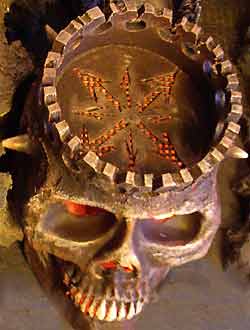 I made this
large skull by chopping the top off of a plastic skull, adding some pipe
with holes drilled in it, and cut notches in it to form a "crown".
I glued a flat plate to the pipe to form a floor to stand on. I then
cut slots out of the floor in the shape of a chaos star, and added some
plastic cross-stitch mesh under that to form a grid. Then I glued
it to the hollow skull, so the flickering light could shine up through
the slots. I also cut out the eyes, nose and slots between the teeth
to let more light out. Finally, I cut a hole in the bottom to run
wires (and bulbs) inside, and glued some plastic plates to the bottom for
stability. I primed the whole thing black, then drybrushed
most of it dark red. I drybrushed the crown with steel and brass.
The spikes, teeth, and bone ridges were drybrushed light brown and then
white for a bony effect. I left the interior the original white glossy
plastic as I knew it would reflect light well- I only need to put one bulb
in this massive skull to get a good effect. Click
here for another shot of the large skull in action.
I made this
large skull by chopping the top off of a plastic skull, adding some pipe
with holes drilled in it, and cut notches in it to form a "crown".
I glued a flat plate to the pipe to form a floor to stand on. I then
cut slots out of the floor in the shape of a chaos star, and added some
plastic cross-stitch mesh under that to form a grid. Then I glued
it to the hollow skull, so the flickering light could shine up through
the slots. I also cut out the eyes, nose and slots between the teeth
to let more light out. Finally, I cut a hole in the bottom to run
wires (and bulbs) inside, and glued some plastic plates to the bottom for
stability. I primed the whole thing black, then drybrushed
most of it dark red. I drybrushed the crown with steel and brass.
The spikes, teeth, and bone ridges were drybrushed light brown and then
white for a bony effect. I left the interior the original white glossy
plastic as I knew it would reflect light well- I only need to put one bulb
in this massive skull to get a good effect. Click
here for another shot of the large skull in action.
A WORD ON THE JOYS OF FLICKER BULBS
I first discovered how cool flicker bulbs can be for simulating fire
during our Mordheim campaign. I've made
some improvements since then. First off, I found that Joann's Fabrics
carries flicker bulbs year round! Previously I had been at the mercy
of stores like Target that only carried bulbs around Halloween. Second,
the bulbs that Joann's carries are smaller, sturdier, more reliable, and
cheaper! They come in a 2 pack for $3.49, and are called "Welcome
Lamp" flickering flame bulbs. These little guys aren't very bright,
but they also don't require much power- only 1 watt each! They stay
very cool as a result, making them ideal for scenery. A typical 5-watt
bulb socket (small socket) should take them. The third thing
I discovered was a Halloween decoration at Wal-Mart, called "5 skull
lawn stake", for only $12.00 (a Halloween only item though).
This is a set of lawn lights, shaped like full size skulls, that you can
stake into the ground. The skulls are great for scenery (they are
what I used for the large skull), but the added bonus is the 5-socket light
string, perfect for flicker bulbs!
Back to Chaos scenery
Back to Necromundicon