THUNDERHAWK Construction
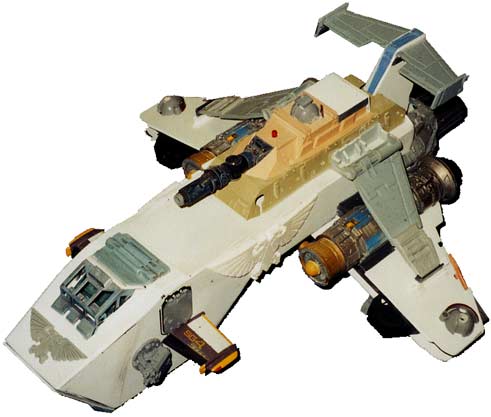
BASIC BODY CONSTRUCTION. I built the basic shape (body,
main wings, tail fin) out of sheet styrene
plasticard (1/16" thick), reinforced on the inside with corner bracket.
Below are some (rough) templates for all the areas made of sheet plastic.
(Click the links, print, and use your BACK button to return here.)
TEMPLATES 1 TEMPLATES
2 TEMPLATES 3
These cover all the areas that aren't made of toys or models (more on
those later). Print, then resize with a photocopier until noted dimensions
match. Then mark on sheet plastic and cut.
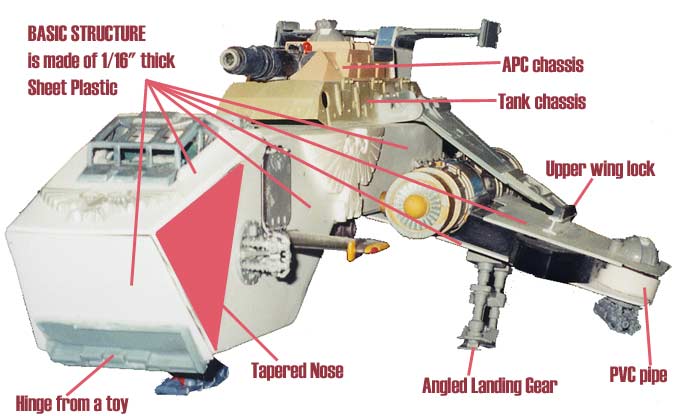
Of particular note is the nose. The side panels are not parallel
the whole way- they actually taper in along an angle line. This really
helps give the Thunderhawk more of a sleek and menacing shape, not so brick-like.
The taper is subtle (too much and the Rhino couldn't fit inside) but effective.
MAIN ENGINES AND WINGS. The critical piece holding it all
together are the two main engines, taken from the Anakin Pod Racer toy.
I left the engines connected together for strength. The
connecting bar was inset into the body (I cut a notch in the body so the
bottom of the cross bar would be flush with the bottom of the ship's body).
The bottom wing is one piece of plastic that runs all the way across, for
strength. It was glued to the bottom of the body (covering up the
crossbar), and then the ends were carefully bent downwards so that
it would have approximately the right angle (the pod racer engines help
push the wings down at the correct angle). Then I added spacers
made from printer ribbon cartridges on top of the bottom wing layer.
I then glued the top wing layer onto the spacers (with the intention of
filling in the rest of the gap between the two layers with various detail
bits).
TAIL FIN. The tail fin was also made by layering sheet
styrene, but this time I used plastic clothes pins for spacers. The
tail wing pieces are made entirely of sections of the wings from a T-16
skyhopper toy.
LANDING GEAR. The front gear is a leg from an Exo-Squad
toy (JT Marsh). All I did was trim it down so it was symmetrical.
The rear landing gear is from the Millenium Falcon action figure toy.
I cut the tops at an angle, and cut a notch out of the back of the leg
near the feet to match the top angle. The original gear went straight
up and down- by adding some forward angle, they look much more dynamic
and realistic (and they don't stick up so high).
HEAVY BOLTER TURRETS. All 4 turrets are made using the
turret from the plastic Land Raider kit ( I mail ordered extra sprues and
cannibalized some kits). These are nicely articulated, so I wanted
to enable them to rotate and elevate.
To mount the front turrets, I carefully scribed a hole on each side
of the forward hold. NOTE: the inner ring on the bottom of the turret
is EXACTLY the same as the internal diameter on thick walled 1" PVC pipe.
I actually used a short length of pipe to form a template for scribing
the hole- I used the tip of a sharp knife to do the actual scribing.
To hold the turrets in place, I inserted them into the holes, and then
from the inside of the hold, I glued a plastic plate across the bottom
of the turret, long enough to overlap the inside wall of the hold.
The plate had to fit between the ammo feeds so they could still elevate...
I actually cut the feeds down a little so there would be enough room
in the hold for the Rhino.
For the wing turrets, I mounted them under the wing, I actually
glued a length of 1" thick wall PVC pipe into the wing, attaching
it to the inside face of the top layer, with a big hole in the bottom layer
to allow the tube to stick out a bit. Then I built a targeting dome
to go on top of the wing, with a rod attached to it that could run down
to the heavy bolter turret. This would allow me to turn the turrets
below by twisting the dome on top! I drilled a hole in the top wing
layer just big enough for the rod to fit through. I had to add a
sturdy Mounting block of plastic to the turret itself (again careful to
attach it between the ammo feeds so they could still elevate), and drilled
a hole in the mount for the Rod to fit into. The picture below
shows the underside view of a wing, and the various pieces involved.

BASIC CONSTRUCTION COMPLETED WITH TOY AND MODEL PARTS.
The most valuable parts came from the following toys and models, primarily
Star Wars ones strangely enough. Here's the parts I recommend (most
critical listed first).
Anakin's Podracer toy (6" figure scale)--- WING ENGINES. You can
still find these for
sale on E-Bay these days...
Sebulba's Podracer toy (6" figure scale)--- REAR ENGINE, Detail parts
on the back of the wings
Battlestar Galactica Model Kit--- REAR end piece, detail panels on
the underside.
Eagle Belt Buckles and Badge- these were added to the sides and front
(you can get them at Bulldog Buckle
Company!).
Xyber-9 Hovercraft toy--- LIFTER ENGINE, FOREWINGS
T-16 Skyhopper toy (6" figure scale)--- UPPER WINGS, TAIL PLANES
Millennium Falcon Model Kit --- DETAIL PANELS, seen on the left
and right side of the main body
Millenium Falcon toy (6" figure scale)--- REAR LANDING GEAR
Exo-Squad JT Marsh toy-- FRONT LANDING GEAR
Various Tank Kits, X-Wing toys (Action Fleet scale)--- SURFACE DETAIL
Packaging from a LightMouse (computer mouse)--- BLINKING LIGHT
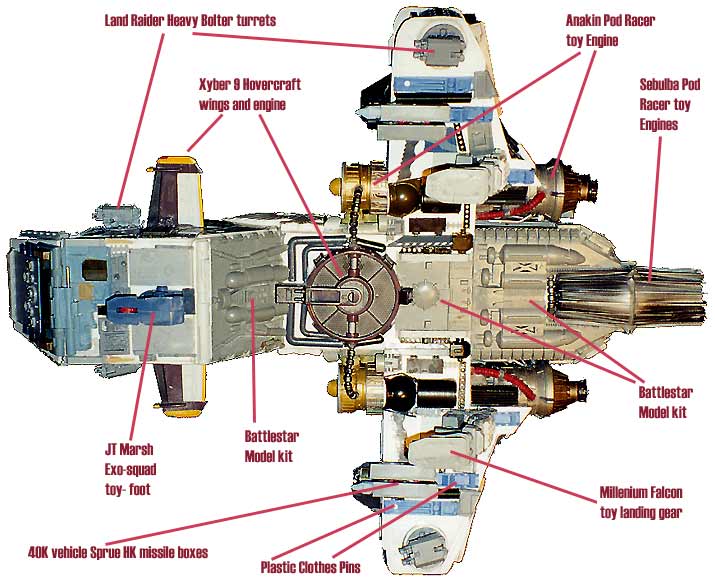
The following three views call out what toys and models were used where.
FRONT VIEW
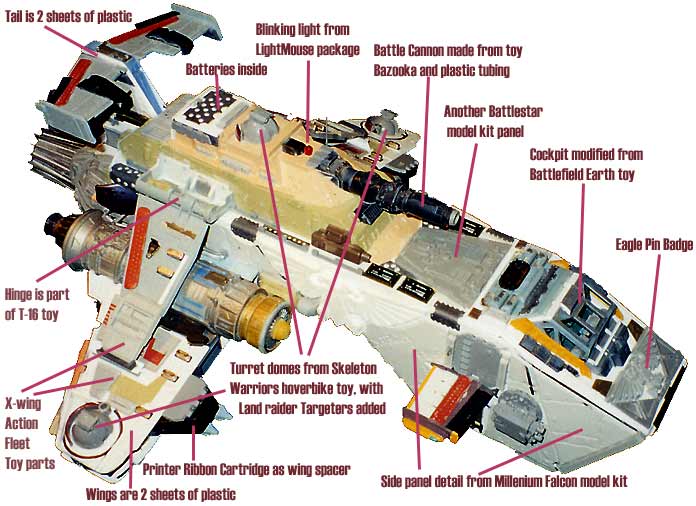
BACK VIEW
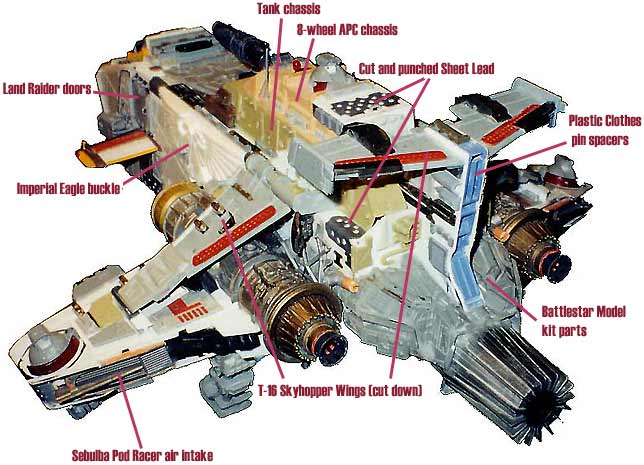
BOTTOM VIEW
FINE DETAILING- Most of the fine details are from model
tank kits, though I used a lot of electronics parts too. I even punched
holes in pieces of sheet lead and cut them into cool shapes for some details.
Sheet lead is soft, bends and cuts easily, and superglues well. The
shots above show the model with all of it's detailing in place.
The engines already had loads of detail, thanks to their source (podracer
toy). All I did was cut off the rear cones, put a diffuser nozzle
in their place (made of a filtration unit from a fish tank), shorten the
nose cones on the front, and round the front of the cowling to make them
look more aerodynamic and closer to Games Workshop's Thunderhawk engines.
The "guts" of the wings were detailed to imply extra intakes and
secondary engines as an attempt to justify the thickness of the wings
(not much aerodynamic about a Thunderhawk- must be all that thrust that
keeps it aloft!). The top and bottom of the wing surfaces were
detailed with action fleet X-wing toy wing parts, tank kit bits, model
kit bits, strip styrene (plasticard cut into strips), and sheet lead cut
with novelty scissors and punched with hole punches.
The details on the sides of the ship were done mostly with panels from
a Millenium Falcon model kit, cut to fit. Since the body was built
from sheet styrene plasticard, I could use plastic solvent cement to glue
on almost all the details since most of the toy and all of the model parts
were made of styrene. This was much faster, cheaper, and safer than
having to use superglue for attaching detail (which inevitably ends up
going on crooked, or not at all as it is now glued to your left thumb).
Even the landing gear, nice as it was (I angled some gear from the Millenium
Falcon toy), recieved extra detailing. Plenty of pipes and hoses were added
around the lifter engine and main engines too.
PAINTING THE MODEL
I decided to go with a Dark Angels color scheme, since I wanted it
to be dark and rugged looking and not so toylike. My Dark Angels
models doesn't seem to mind my decision... I primed with flat black
enamel spray paint. Drybrushed a base coat with Dark green, blue-green,
olive green. Some areas were painted dark grey or black for contrast,
then drybrushed with tan or grey. Lots of brown washes were
used over the whole model, especially dark brown in all the recesses and
mechanical areas.. Metal chipping was done by stippling the
edges with a stiff brush and steel paint. Lots of 40K decals and some Zoids
stickers were used.
Back to Thunderhawk Page
Back to How-To pages
Back to Special Projects
Back to Necromundicon