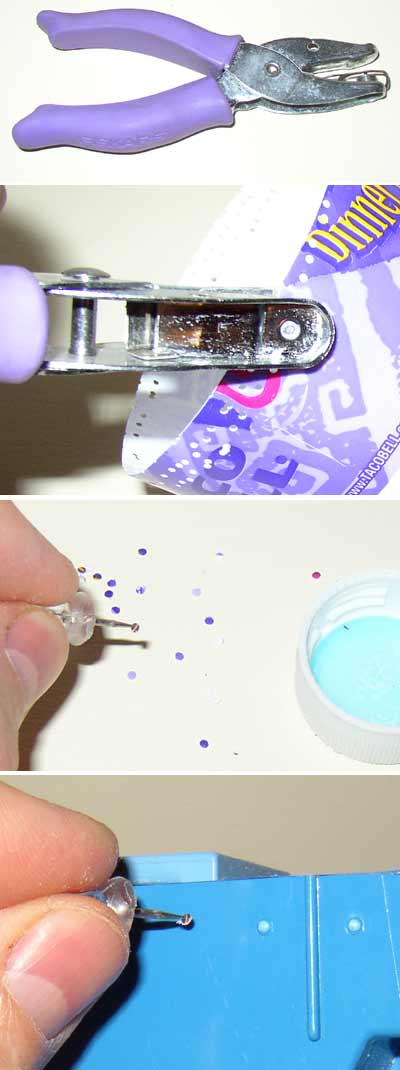
This is a 1/16" hole punch. I got it at the crafts shop (Micheal's),
in the scrapbooking section (they have lots of cool pattern scissors and
paper punches btw!).
I like to use thin plastic cups for my rivets. This one came from
Taco Bell. Face the punch inward so the rivets fall into the bottom
of the cup- tidy! I just go around and around the edge until I can't
reach down any further, then I cut off the perforated area with scissors
(you might save the perforated plastic for Orky terrain).
Now it's time to glue them on! Put a drop of superglue
in an old soda cap (so it doesn't ruin the table, right). Now grab
a sharp pushpin and gently "stab" a rivet to pick it up. Gently touch
the bottom of the rivet on the glue so it picks up just a bit of superglue...
...and just press your rivet in place! You can repeat this process pretty quickly once you develop an eye for good spacing.
Note that this method allows you to place rivets on pretty much any
surface!
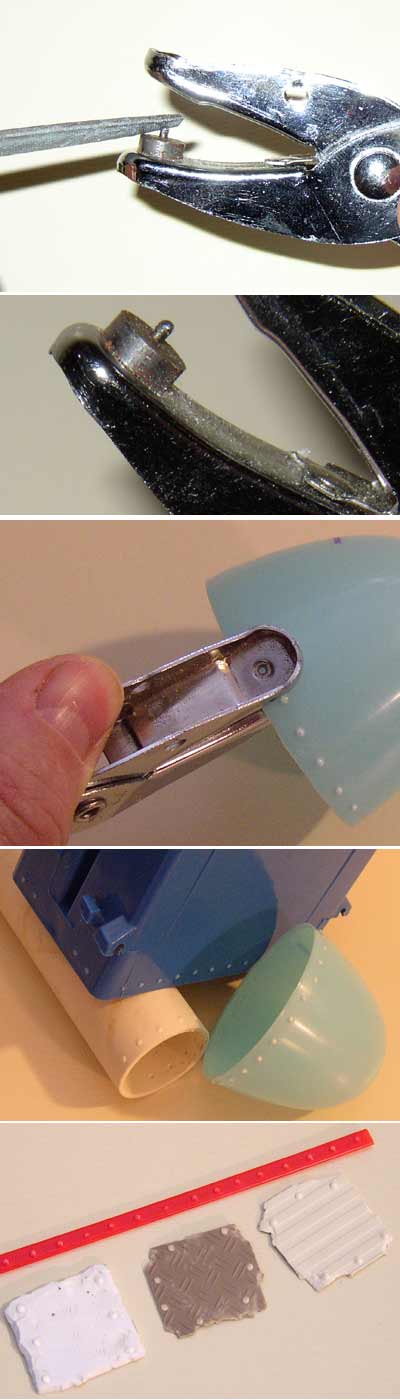
Embossing is even faster and easier than punch and pin, and produces a more rounded head on your rivets.
Embossing also makes use of a 1/16" hole punch, but slightly modified.
To make an embosser, use a metal file to gently round off the edges of
the punch pin.
When you're done, the pin should look like this. Find some thin,
soft plastic- you're ready to emboss!
Just place the plastic in the punch and position the hole of the punch
where you want your rivet. Now squeeze slowly but firmly until a
bump appears. You've made a rivet! Note that usually want to
sand softer plastics before riveting, so that you don't sand the rivets
off afterwards.
Lots of types of plastic can be embossed, especially PVC and styrene.
The softer the plastic, the easier it is to emboss. You can even
emboss through plastics as thick as 1/8" if its soft enough, such as the
electrical box pictured. Plastics that are brittle, such as
acrylicCD cases, cannot be embossed- they'll just crack.
In addition to adding rivets to your base shapes, you can quickly emboss plastic plates and strips before adding them to a model. Even textured plastic can be embossed.! Shown here are a plastic coffee stir stick, some plasticard roughed up with a hobby knife before punching, some double diamond plate, and some ribbed plastic that came from discarded vertical blinds. You can even emboss playing cards or other coated paper products!
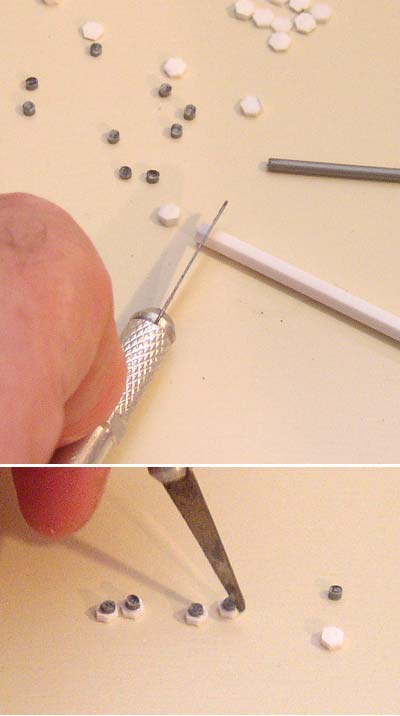
Most folks know about this method. You just get some plastic rod
or sprue, and slice off little disks.
The hard part is cutting STRAIGHT. A sharp hobby knife helps.
Try to slice, rather than chop, by drawing the blade back straight and
level.
What's cool about this method is that you can buy plastic rod from hobby
suppliers in a wide variety of sizes and shapes. For example, the
hex rod seen here makes great bolt heads! Smaller rivets can be made
from thin rod, perfect for tanks and the like.
You can even combine different sizes and shapes, such as these nut and
bolt combos.
Try making square bolts or washers!
Sliced rivets can be applied to your model using the same pin+glue technique used in method 1.